

Simple Strategies For Applying Progressive Overload to Your Programs
A practical guide to managing your load progressions to gain strength and muscle.
When it comes to strength training, it’s easy to get caught up in the fads. It’s easy to fall for that new training style that will be the secret to maximizing your gains. It’s all too easy to buy the dream that the topless jacked guy is selling you during a youtube ad.
If you felt attacked by that first paragraph, don’t. I’ve most likely fell for this stuff more than you have in all honesty. I mean, I’ve been chasin’ gains since I was 14 years old, doing chin ups on the angled tree branch in my front yard. So it’s safe to say, I’ve fell for all of the fads over the years.
One thing I wish I was taught back then, was some basic principles. Two come to mind immediately:
Energy balance
Progressive overload
I honestly think if most folks knew these two principles better, we’d all be a lot more bullshit-proofed when it comes to falling for fitness marketing propped up by needles of truth, within in haystacks of misleading sales tactics and well marketed ignorance.
The second principle is the one I’m going to be talking about today.
Understanding progressive overload is crucial when it comes to understanding how to make progress in the gym. A simple way to think about progressive overload is this:
“The need to increase the given demands or stimulus on a muscle or movement to promote further adaptation.”
In other words, your body is only going to adapt to a stimulus it needs to.
This means that training with easy loads, far from failure probably won’t yield much results.
Or following the same program without ever adding more volume over time, will also lead to a faster plateau than if you incorporated some sort of load or volume progression.
You have most likely seen this before. Perhaps you or someone you know begins a new workout regime and sees great results. Then the results fizzle out eventually. You or the person you know keeps doing the same thing that used to work and are puzzled to why it isn’t working anymore. The reason is because your body already adapted to that stimulus. Leaving no real need to adapt further to that same stimulus.
This is where progressive overload comes into play. You could do the exact same program technically, but if you just added more load over time, you’d still see results. The issue with this, is that it gets boring as hell and also, as you get more advanced, periodizing your programs does become more important to continue seeing more results.
With all of this in mind, I want to go over three simple strategies that you can use with your programs to make sure you’re applying progressive overload over time.
Keep in mind you don’t only have to use one of these and there are other strategies out there. This is meant to be simple and practial.
1. Rep Out Sets (also known as “plus sets”)
The “rep out” set is something I started using a while ago with myself and clients as a way to use the feedback of your performance to inform your decisions about progressing loads.
The idea is simple. Say your program called for 3 sets of 6, with the last set being a rep out set. However many reps you do on the last set will dictate if and how much weight you’ll increase next week by.
You can take the last set to failure or you can just set a rep out target or cap.
Failure is simple, you just send it and push yourself to failure on the last set. The upside of this is that it does help you understand training to failure better and can perhaps help calibrate how far your other working sets were from failure.
The downside is that taking a set to failure, particularly with a heavy compound lift, is fucking exhausting and just not necessary for most of us. Which could derail the rest of your workout.
While taking a set of biceps curls to failure is most likely not going to contribute a lot of systemic fatigue.
When it comes to looking at training to failure with compound lifts, you can think of more “technical failure”. This would be the point when you could perhaps do another rep or two, but your technique would suffer greatly.
While when training more isolation or machine lifts, you can actually train to muscular failure more effectively without as much downside.
For a deeper dive on training to failure, check out this previous article I wrote.
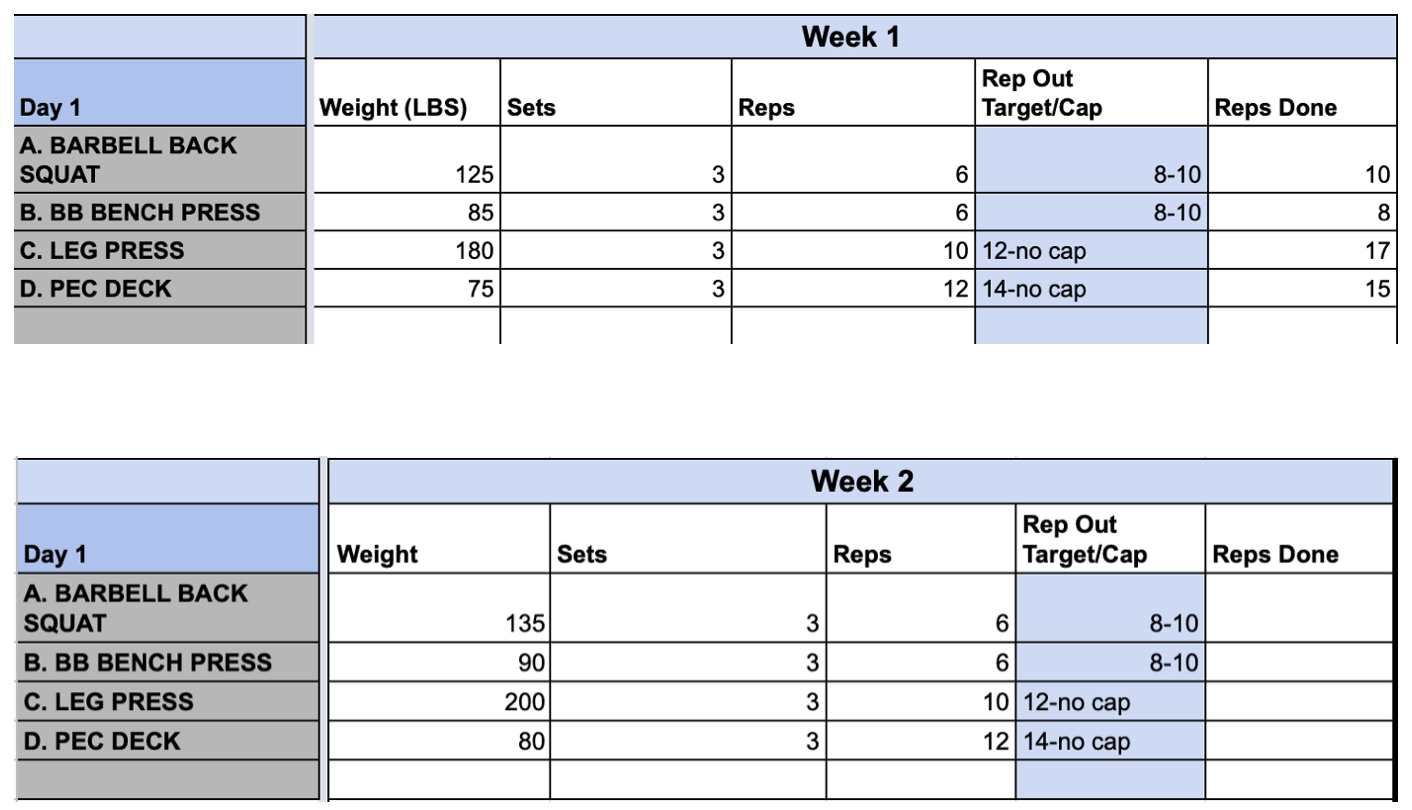
This is also where a target or cap comes into play. Say you’re doing 3 sets of 6 squats with 125 lbs. The last set has a rep out target of 8 reps. If you hit it, you could add load to next week.
You could also put a cap at 10. So you’re repping out the last set, but capping it at 10, even if you could do more. If you hit 8, perhaps you add 5 lbs total to next week, if you hit 10, you add 10lbs total. Pretty straight forward.
Here is an example of how this could look in a program below.

You’ll see that the rep out target was hit for the squat and bench so the weights went up a little for week 2.
You’ll also see the leg press rep out target wasn’t hit, so the week 2 load stayed the same. Lastly, you’ll see pec deck rep out set was actually less than the prescribed weight, so the load went down for the following week to make it a bit more manageable.
Next, I’ll show an example with a cap.
Here you’ll see there was a cap added for the squat and bench, but there was no cap for the leg press and pec deck.
The squat hit the cap, so load increased a bit more than the previous time. The bench still hit 8, so the smaller progression was made. The leg press really crushed the rep out set. This indicated that the load was definitely too light, since you’ll see they banged out 7 extra reps on the last set. This would indicate that the set of 10 reps would’ve had at least 7 reps in reserve (RIR for short). Alternatively, you could say this was an RPE (rate of perceived exertion) of 3 or 4.
Below you’ll seen an adaptation of the RPE scale from this paper by Mike Zourdos et al.

When it comes to adding load based off the rep out set, it is a bit of guesswork, but I like to keep it simple. If you hit 1 rep above, you should probably just keep the weight. As if you hit that an extra rep or two the following week, that’s still progressive overload.
If you hit 2–3 reps, I usually suggest just going up by about 5 lbs. If you hit 4–5 reps, consider adding 10lbs and if you knock it out of the park and hit above 5 reps, then consider upping to a load that would be a challenge to hit an extra rep or two on for the last set.
As mentioned, it’s a bit of guesswork, but learning how you respond to load increases is also an important skill.
2. Rep Ranges
The second strategy I want to go over, is using rep ranges. This one is much simpler than the first one too.
Say you have 3 sets of squats. Typically, you’ll see one rep target assigned to it.
Example: 3 sets of 10 reps.
This is the norm, but you don’t have to stick to a rigid rep target. You can use rep ranges to actually guide your progressions.
Example: 3 sets of 10–12 reps.
Using this example, the load progression would be made when you finally do 3 sets at the high rep range.
See below:

The rep range for the back squat was 3 sets of 10–12. The metric to hit in order to progress, is to do 3 sets of 12 reps with the given load (125 lbs in this example).
You’ll see that in week 3, that did happen. But week 2 still incorporated some progressive overload — even if it was just one rep. It’s important to acknowledge this because you won’t make great progress every week. In fact, some weeks you won’t at all. The goal is to progress over time. These are just very clean examples I’m using.
In week 4, after hitting three sets of 12, the load increase 10 lbs. You could also have only added 5. You’ll want to guage this to make sure the new weight is at least doable for the prescribed number of sets with the lowest rep number in the range.
One thing to note is to not get married to any of these numbers. You can set larger or smaller ranges. You can also do ranges at different numbers. If you do go lower reps, the ranges should be a bit tigther though. As 3 sets of 2–6 might take forever to make noise with as turning a working set of 2 into a working set of 6 is a much taller order than turning a working set of 10 into a working set of 12 is.
3. Set Progressions
The last example I want to use, is adding sets. Of all of these strategies, this one is more time consuming. As adding reps isn’t nearly as time consuming as adding sets is. So if you’re time crunched in the gym, this might be the strategy you’ll use the least.
Back to our example of 3 sets of 10 back squats. If you hit 3 sets of 10, you could add more load to make the sets of 10 more challenging and you could also just add more reps to that load too. Both are great options.
But the one that will add the most volume, is adding a set. As mentioned though, it does come at the cost of more time spent at the gym and probably more fatigue. Now, fatigue is not the boogeyman, but it does have to be factored in when planning for your weekly workouts in entirety. As, if day one of your program just gasses you, it may have a negative impact on your ability to still train hard throughout the week.
Using a set progression, is very straight forward. Instead of adding more reps or load, you just add a set.

If you look above, you’ll see that in week 1, 3 sets of 10 at 125lbs was hit. In this example, the set progression model was applied. For week 2, there was 4 sets of 10 now, instead of of 3. Then you’ll see that in week 2 and 3, that final set didn’t hit 10. So load stayed the same and the goal remained to hit 4 sets of 10. Which did happen at week 4. From there, you could actually add another set (although 5 sets of 10 sounds brutal), or you could just increase load and start back at 3 sets of 10, with the goal to get back to 4 sets of 10 with the heavier load.
As I mentioned earlier, you can also combine some of these strategies. See below I combined the rep range with the set progression.

Once three sets were hit with the highest number in the range, a 4th set was added and the same cycle was repeated.
Here is another example of mixing rep out targets with a set progression.

You’ll see that in week 1, the rep out target was hit. So a 4th set was added. This made the rep out target even harder to hit on the last set due to the volume increase. Once it was hit in week 4, load increased in week 5, but sets also decreased. The same cycle could repeat here.
Side note: I’ve made progressions quite clean for this article. Training and progressions will not always be these simple week to week. This is just a framework to work off of
Summary
The point of this article was to help give you some practical strategies for you to apply with your own training to ensure you’re progressing overtime. If you want to get stronger, it’s key to remember the principle of progressive overload.
As you’ll see in the examples above, all of them are based off of this principle. Even if the progressions are small, they will make a difference over time. Which is why programming and periodizing your training can be so valuable. It helps you organize your training in a way that keeps you progressing in the macro sense. You won’t make progress every single week. In fact, some weeks you’ll probably regress. The thing to focus on is your progress over the long term. Strategies like this can be crucial for helping you stay on track and keep taking small steps that will add up in the long run.
The three I covered were:
Rep out targets/plus sets
Rep range progressions
Set progressions
This is not THE list of progression tools. In all honesty, it’s a very small one. But the goal here is to give you some easy and applicable strategies that you can apply immediately to your programs.
Give these a shot and let me know what you think. I’m always happy to hear back and if you found this valuable, consider sharing it with a friend who would learn from this article.
Happy lifting and stay strong. 💪🏽
Coach Dylan