

The Beginners Guide To The Squat
Your Guide To Squatting Effectively And Confidently

The Squat. Some call it the king of all exercises. Some say they’ll bust your knees up. Safe to say there is controversy around this pivotal movement that we all do in some way every single day. Whether you love or hate it, you do it everyday to some degree.
What I want to talk about today is squatting as an exercise. What you should know about it. Ways you can do it. And how you can apply it to your program.
This is the beginners guide to the squat so if you’re a powerlifter looking to hit new PRs, there are probably better resources than this article out there. I would check out Greg Nuckols definitive guide to squatting if you’re more advanced!
But if you want to learn the basic fundamentals about the squat and how you can start applying them to your training immediately, then humour me and give this a read. This is the beginners guide to the squat, but there will be plenty of things that you can learn about the squat here, even if you’re not a true beginner.
What Is The Squat?
The squat is simply the movement of sitting down and standing back up. Within that oversimplified frame work, there are endless ways to train it and develop it.
Every time you take a poop, you squat down to the toilet (the eccentric phase). When you’re done, you stand back up (the concentric phase). Allow me to segway this toilet humour to some basic physics of human movement.
On the way down to the toilet, your muscles are taking on an increase of load and force. Your hips sit back and your knees move forward. Gravity plus your bodyweight increase the load on the joints and muscles involved in this proccess.
Your quads mainly extend the knee. Since the knees are flexing under load on the way down, the quads have to fight that force to control you from not just falling. This is the eccentric part of a an exercise. We can call it the part where you take on the load. Same thing is happening to the muscles that extend your hips too.
Your spine is also under load here. The difference is, it’s actually resisting movement and acting more as a stabilizer. Your trunk muscles (or “core” as its commonly called) help brace the spine and torso to keep it stable as you sit. Of course it can move and will a little, but as we progress this movement from the bathroom to the gym, we will aim to have it remain more stable and rigid with the squat.
Now, once you’re done with your business, you stand back up. This is the concentric part of the squat. The joints involved that were flexed under load (hips, knees & ankles) now need to extend to help you stand up. They way they extend is from the muscles that carry out these actions by pulling on the joints to produce the force needed for you to stand up. So the quads (thigh muscles), the glutes (your butt), the hamstrings/adductor magnus (back of your thighs) and even a little bit of your calf muscles.
The shorter your range of motion (say you have a high toliet) the less these joints need to flex to get down and extend to stand up. Which would mean less load would be placed on them and less force would need to be exerted from your muscles to complete the movement.
This is why range of motion matters when it comes to training. Less range of motion typically makes for less load on your muscles/joints. Which will generally create less stimulus and less adaptation. Fancy terms for less strength, growth and tolerance of load.
Think about it like this from a joint integrity perespective: If you only ever did half or quarter squats, your joints and muscles would have very miminial strength and tolerance for deeper positions of the squat. So if you for some reason found yourself down deep, you would be less prepared to handle it. For older folks, this could have some serious implications when it comes to issue of falling. If my 80 year old grandma was still able to squat deep while holding a 10lb dumbbell, I would feel much more confident in her ability to manage a fall. If her muscles and joints hadn't been loaded in that position in over a decade or longer, I would feel way more terrified at the idea of her slipping or ever falling.
Not to get too grim, but I want to point out that squatting/strength training doesn’t exclusivley serve purposes related to vanity and performance. There are longevity and practical reasons to engage in some level of these movements at any stage of life.
We are also done with the bathroom analogies. There were two reasons I used it:
1. I’m a man child who still laughs at toilet humour.
2. It truly is a valid example. Everyone has to carry out this movement to some degree on a daily basis. So when people say you shouldn’t squat, they are overlooking the fact that we all squat every day. So training the movement in a smart way is NOT a dangerous thing. Which should not be conflated with training it in a reckless way. Such as squatting more weight than you can actually manage.
Working Muscles Of The Squat
I just touched on this briefly, but I’m going to expand on this a little more here.
There are countless muscles involved with the squat to some degree. So we’re going to simplify this, considering this is still the beginners guide to the squat. So I’m only going to talk about the agonist (muscles that actually help move the load up) and main stabilizers.
Primary Movers (agonists)
The three primary movers of the squat are the quads, the glute max and adductor magnus.
The quads will extend the knee. Since the way down will require plenty of knee flexion (knees going forward) the quads will have to do a lot of work to extend the knee on the way up.
The glute max will extend the hip. Since the way down will require plenty of hip flexion (hips going back) the glute max will have to do a lot of work to extend the hips on the way up.
The adductor magnus will also extend the hip. So it will carry out a similar task as the glutes by helping with hip extension. It will also help out even more if you assume a wider stance, since it also helps adduct the hip (bring the thigh closer to the midline).
Secondary Movers
There are two main secondary movers in the squat. The hamstrings and the calves. The reason they are secondary movers are because they will help with the movement, but you shouldn’t expect them to grow in size or strength significantly from the squat.
The hamstrings will also help with hip extension. Similar to the glutes/adductor magnus. The reason you won’t see much growth from them though, is because they are biarticular. This means they cross two joints. This means they cross the hips and knees. So on the way down, they lengthen as the hips go back, but they also shorten as the knee bends. This will make them antagonists as well. This means they shorten as the working muscles lengthen and vice versa. The hamstrings will contribute to hip extension, but the fact they shorten from knee flexion will largely make them less stimulated and most likely won’t grow much from squats as seen here. So there will be tension on the muscle, but the glutes and adductors will exclusively be acting on the hips to carry out the extension part of the lift. Making them the primary movers with the squat in regards to hip extension.
The calves will also help by extending the ankle on the way up. But don’t expect a lot of calf growth here. The range of motion will be very small and they won’t be able to full contract and extend the ankle fully (unless you finished the squat with a calf raise which I don’t recommend).
So these two will be involved, but if you’re aiming to grow these muscles, there will be much better exercises to choose for them specifically.
Stabilizers
The main muscles we will talk about here are your spinal extensors and your “core” muscles.
On the way down, there will be some force on the spine to flex. So the spinal extensors will need to fight that. The “core” muscles are commonly referred to as the rectus abdominus (six pack abs), obliques (side of ab muscles) and your transverse abdominus (the one you use to suck your stomach in).
The job of these muscles will be to keep your torso stable so that your your prime movers can carry out the movement. If the spine starts rounding out and moving all over the place, it will change the load placed on the working muscles and even the spine (we will get to that later). So a rigid spine can really help with having an efficient squat. Keeping your torso stiff and upright will mainly be the task of the spinal erectors though, since their main action is keeping the spine upright.
How to Squat + Considerations
This segment is more complex and individual than the rest. There is not a uniform way to squat. The only must is that you squat down and stand up. As I had mentioned before, there are countless ways to do that. There are different stances, techniques and styles of squatting. So this will be more general.
Bar Path/Centre Of Gravity
One way to fit yourself for an efficient squat for you, is to address the bar path or centre of gravity with your squat.
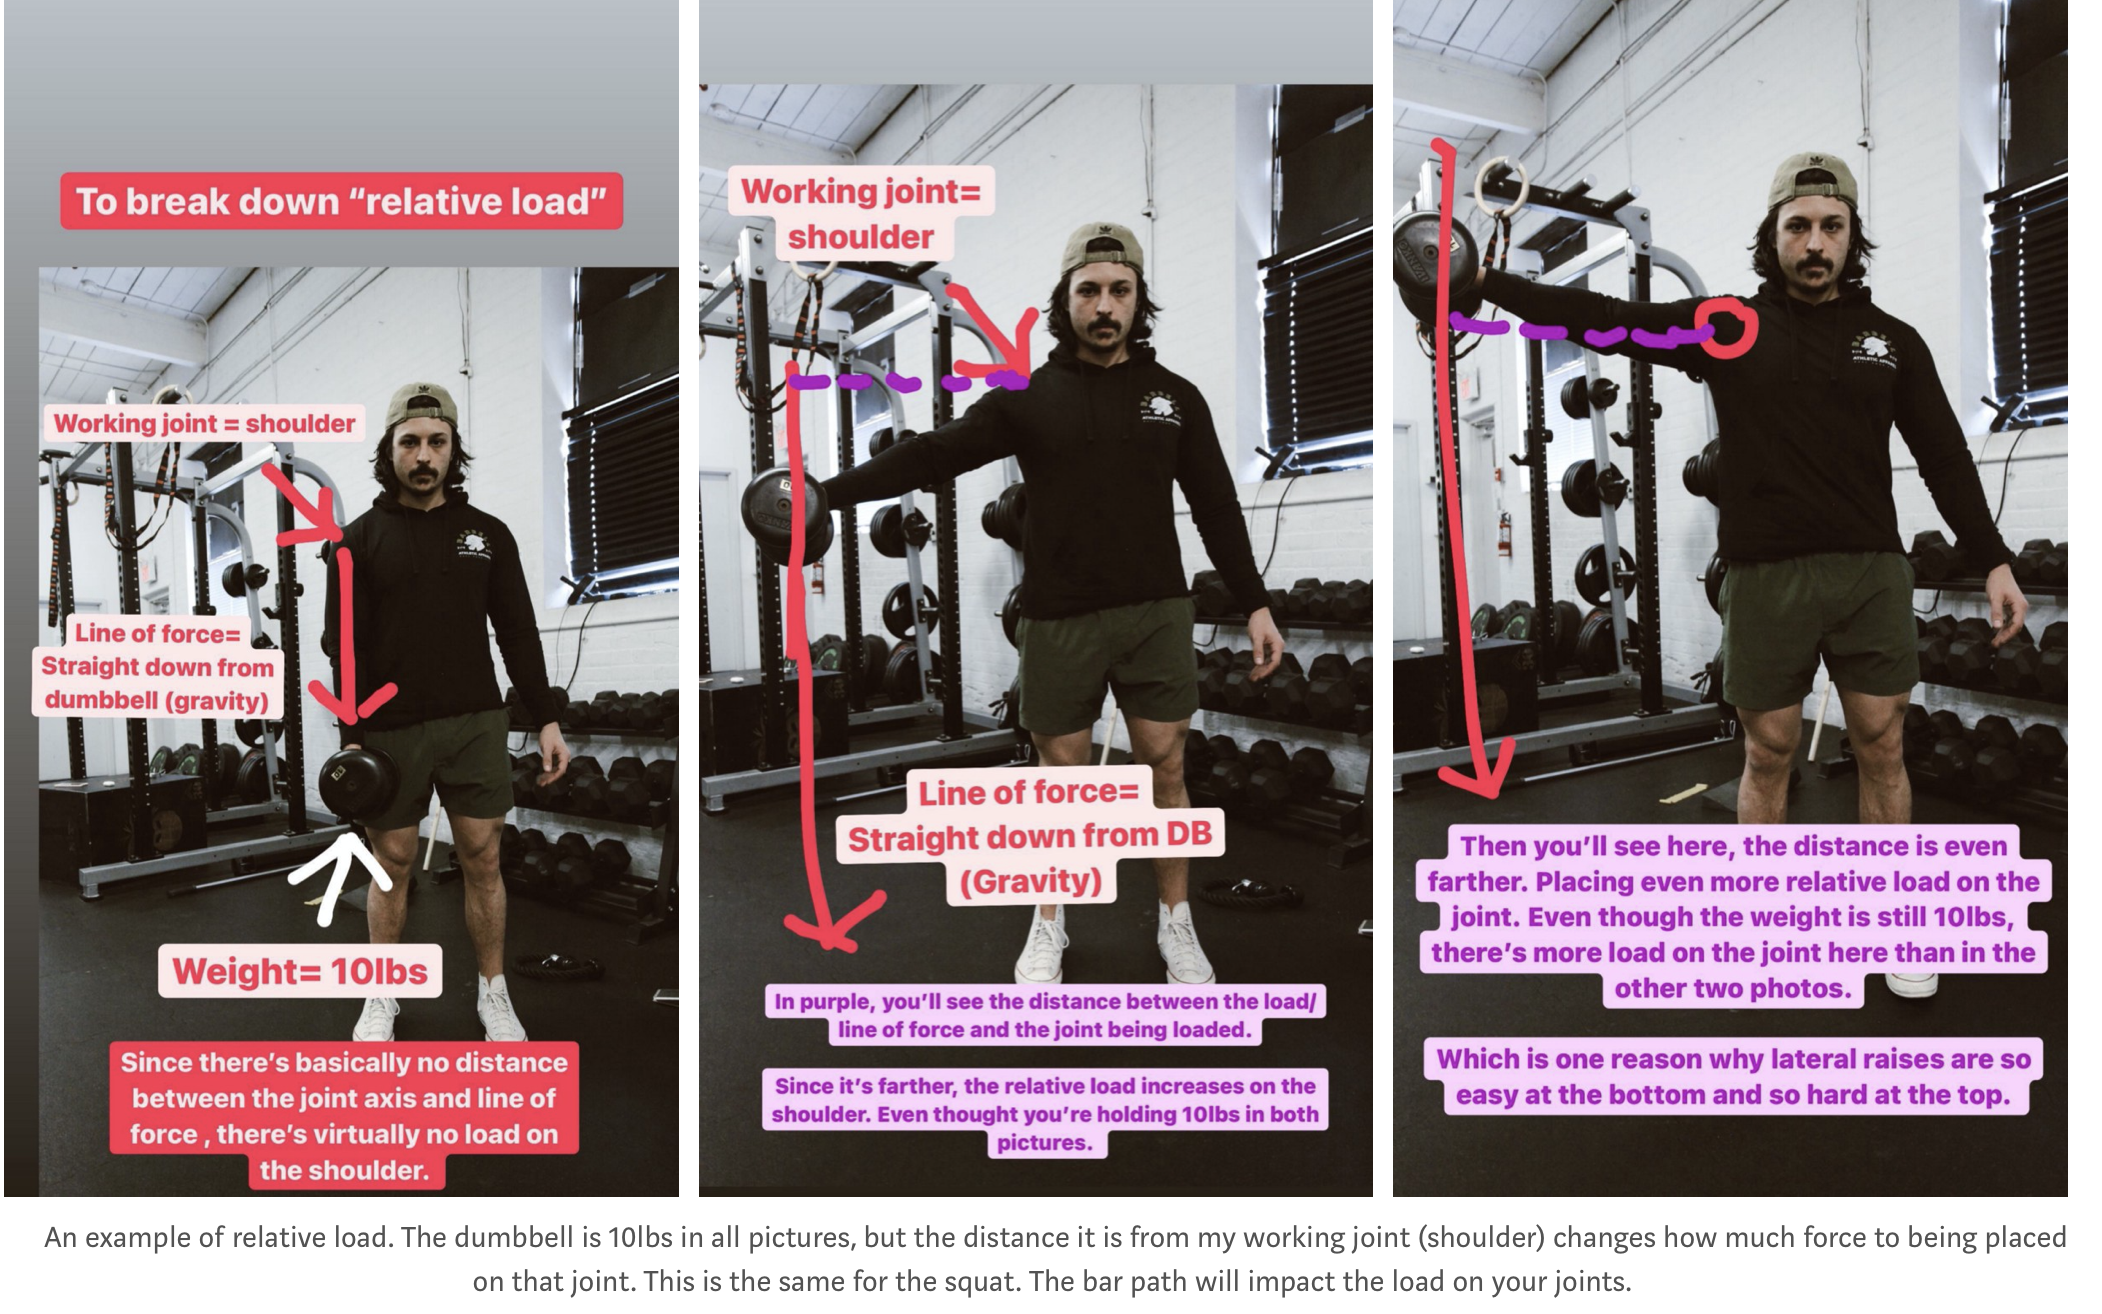
As I mentioned before, maintaining a rigid spine will allow for you to squat more efficiently because the bar won’t be moving around so much. This touches on bar path. Similar to throwing a jab in boxing, the most efficient squat is one that travels up and down in a straight line. This is what we call the bar path. Since the squat is a free weight exercise, the barbell + gravity is the acting force on your body and joints. The weight will always be the weight (say 100lbs) but that load can relatively change for the working muscles. So if the bar travels farther from the joint being loaded or the joint travels farther from the barbell, this will result in an increased amount of load on your joints.
This is why standing with your arms at your sides is easy, but holding your arms out away from your body gets tiring real quick. Your arms weigh the same in both situations, but the actual load placed on your shoulder drastically increases when you stand with your arms out to your side.
So if you’re squatting on the way up and lose that stiffness in your spine, the bar might move a little bit and increase the relative load on certain joints while reducing it on other joints, making the exercise more challenging.
You can see one of my clients exhibiting a very effective bar path on his Front Squat here.
This can also happen from “misgrooving a rep”. Which is where on the way up or down you stray farther away from your typical path. Making the exercise harder than normal. So say you lock your knees out first but your hips are still extended. Now your quads can’t help out as much (or at all) and your hip extensors have to take on all the work to finish the movement. While the bar has most likely moved forward too, so the relative load has increased on your hip extensors while you have less muscles aiding in the movement, since your quads have lost their positioning to help.
One way to help with this would be to fit yourself for a comfortable stance. If you assume a stance that demands more range of motion than you are capable of, you’re probably going to run into problems.
Take me for example:
I have a minimal amount of ankle dorsi flexion (brining my toes to my shin). I also have limbs that don’t support a great upright squat. So squatting with a stance that requires both, will be an issue for me.
It’s important to remember that a type of squat that fits you is one that allows you to squat down while keeping the bar/load within your centre of gravity. As if you move too far away from it, you will either tip forward of backward.
See below, you’ll see two stick figure squatters. They both have the same amount of ankle flexibility in the picture. The only difference is in their limb lengths. Specifically, their femurs (thigh bones). Because the difference in limb length, they should squat a little differently, but in the figure they don’t. In the real world the first figure would just tip over since the load/force is in front the figure’s centre of gravity. To make this work, the figure would need to keep their torso more upright.
This is just to show why there is no uniform squat poisition. Each individual will need to make adjustments so that their squat works for their body.

With this in mind, we will expand on this in the next section to help you figure out some ways to squat that is best for you.
You can see that I will personally turn my feet out during this squat. Again, I have limiting range of motion in my ankles, so turning my feet out will help this. One main reason is because my femur (thigh bone) will travel on an angle now as opposed to in a straight line. This will make my femur relatively shorter, as you will see below. Which will make me need less ankle mobility to carry out the movement.
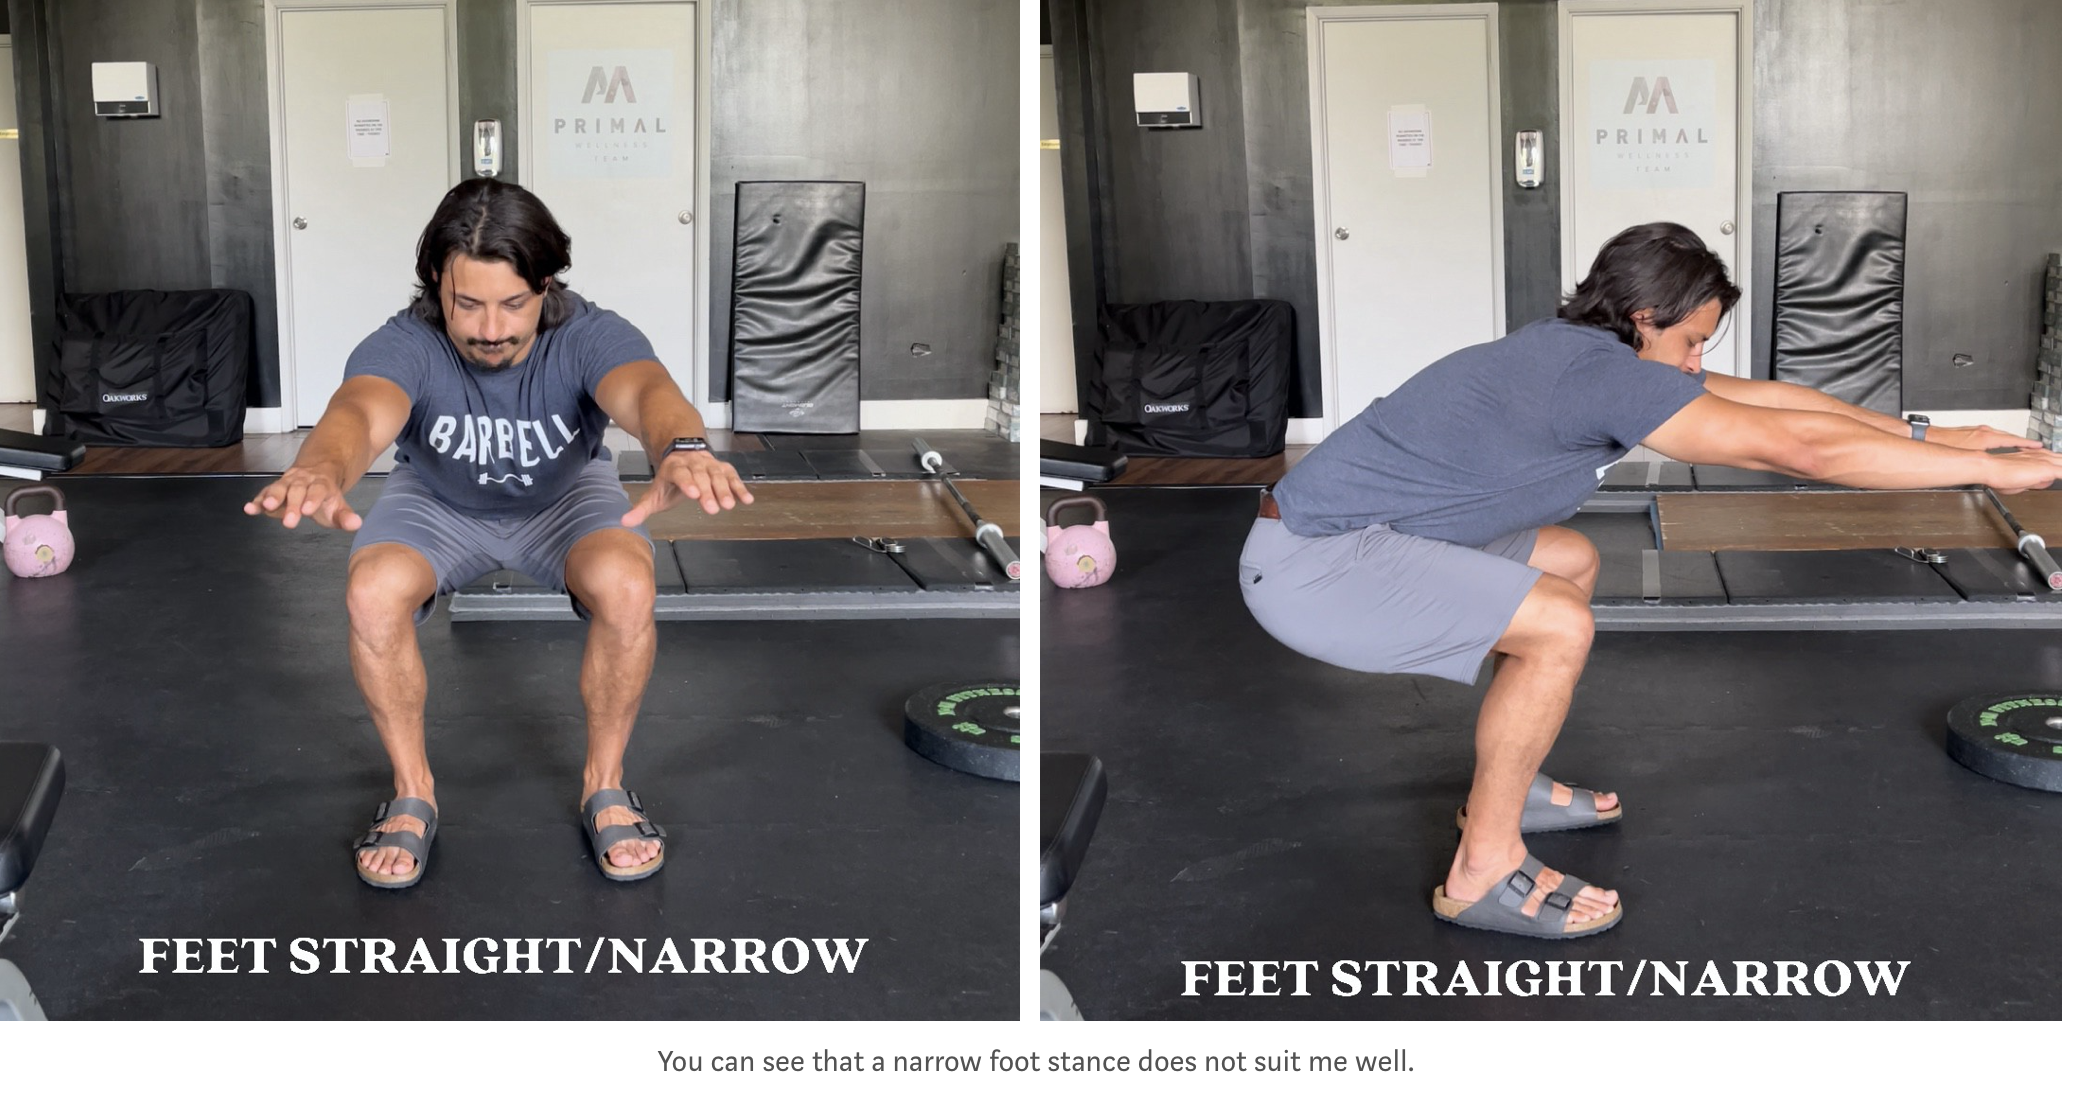
In the picture above, you’ll see I have a narrow stance with my feet straight. This position is totally fine if you have the necessary range of motion to do so. You can clearly see that I do not. This makes me have to round my back out to or lift my heels off the ground to get any deeper in this position. Which is fine to do, but not something I could accomplish nor really want to with a significant amount of weight on my back.
So I can do two things: Adjust my stance or work on severely improving my ankle flexibility. While I can do the latter to some degree, that will take a dedicated amount of time and effort to acheive. In all honesty, I probably won’t do that and the amount of impact I truly could make might not even do as much as I could from a quick change in stance.

Clearly a much better squat for me!
If you look at the stance below, my range of motion has not changed. Only my positioning has. This wider stance combined with my feet out will require me to have less range of motion needed in my ankle. This stance will also recruit more adductors since your hips will travel more in the frontal plane (away from midline and back). You’ll see I have similar angles between my foot and shin in both pictures, but I’m deeper, my torso is more upright and my thigh bone looks shorter. Since my legs are not only driving forward, but also out, this makes my femur (thigh bone) relatively shorter. Thus making me need less range of motion in my ankle to maintain balance as I descend into the squat.
Which brings me a point that you may be unaware of. Some folks who squat ass to grass don’t necessarily have elite ankle mobility. Sometimes they do. But sometimes they just have limb lengths that make it easier to do so. Take a look at this modified picture of my stickpeople below. They both have the exact same amount of ankle mobility in their squats (look at the angle of the foot and shin). The only difference I drew was in femur lenghts. The first one has a much shorter femur, which allows them to squat very upright. The second figure would need far more ankle mobility to squat that upright. If that figure sat as upright as the first one without more ankle mobility, they would fall over.

Now that we’ve broken that down a little bit, I hope you understand that your squat will look unique to you. There are techniques to use within that to improve your squat, but as I’ve said before, there is no uniform squat stance.
Types Of Squats
We’re going to keep this simple today. We’re going to touch on three types of squats.
The Goblet Squat
The Barbell Back Squat
The Barbell Front Squat
The Goblet Squat
The reason we’ll start with the goblet squat is because it is a common one that beginners will use. The reason is the barrier of entry is lower. Since any barbell work will typically require a 35–45lb barbell, the goblet squat allows you start with as low as a 5 pound dumbbell.
The goblet squat is closer to the front squat than it is to the back squat. This is because the load is placed on the front of the body. This also changes your centre of gravity a little bit too. You’ll often notice you can squat deeper and stay more upright for this reason. You can see me executing the goblet squat below.
This is what my goblet squat looks like given what we just broke down about my range of motion and unique biomechanics.
Yours will most likely look different, but here are some things to remember:
-Keep the dumbbell tight to your body
-Find a relatively comfortable position
-Keep tension in your torso/spine so it can maintain more neutral throughout the movement
-Squat as low as you can while maintaining that stiffness and your feet on the floor
-Stand up by driving your feet through the floor.
When driving through the floor, you can think of driving through the tripod of the foot.

The Tripod of the foot. The three more pronounced points of contact that you can use to drive more force into floor with.
You’ll see a graphic of the tripod above. Utilizing these points of contact can help you drive more force into the floor and help increase force production overall. Since the squat is simply you standing up and overcoming the force pushing you down (the weight, gravity and your own bodyweight), this obviously matters.
The goblet squat is a great beginner exercise because as I said, the barrier of entry is quite low. Remember, there is always a learning curve to these exercises, so don’t expect perfection and give yourself the patience required to self organize and figure out your techniques.
The Back Squat
The back squat is typically the most common squat. It’s also the one that is used in competitive powerlifting. It’s likely the one you see most often in your gym and on social media as well.
When it comes to the back squat, there are two main bar positions that are used. The high bar position and the low bar position.
High Bar Vs Low Bar

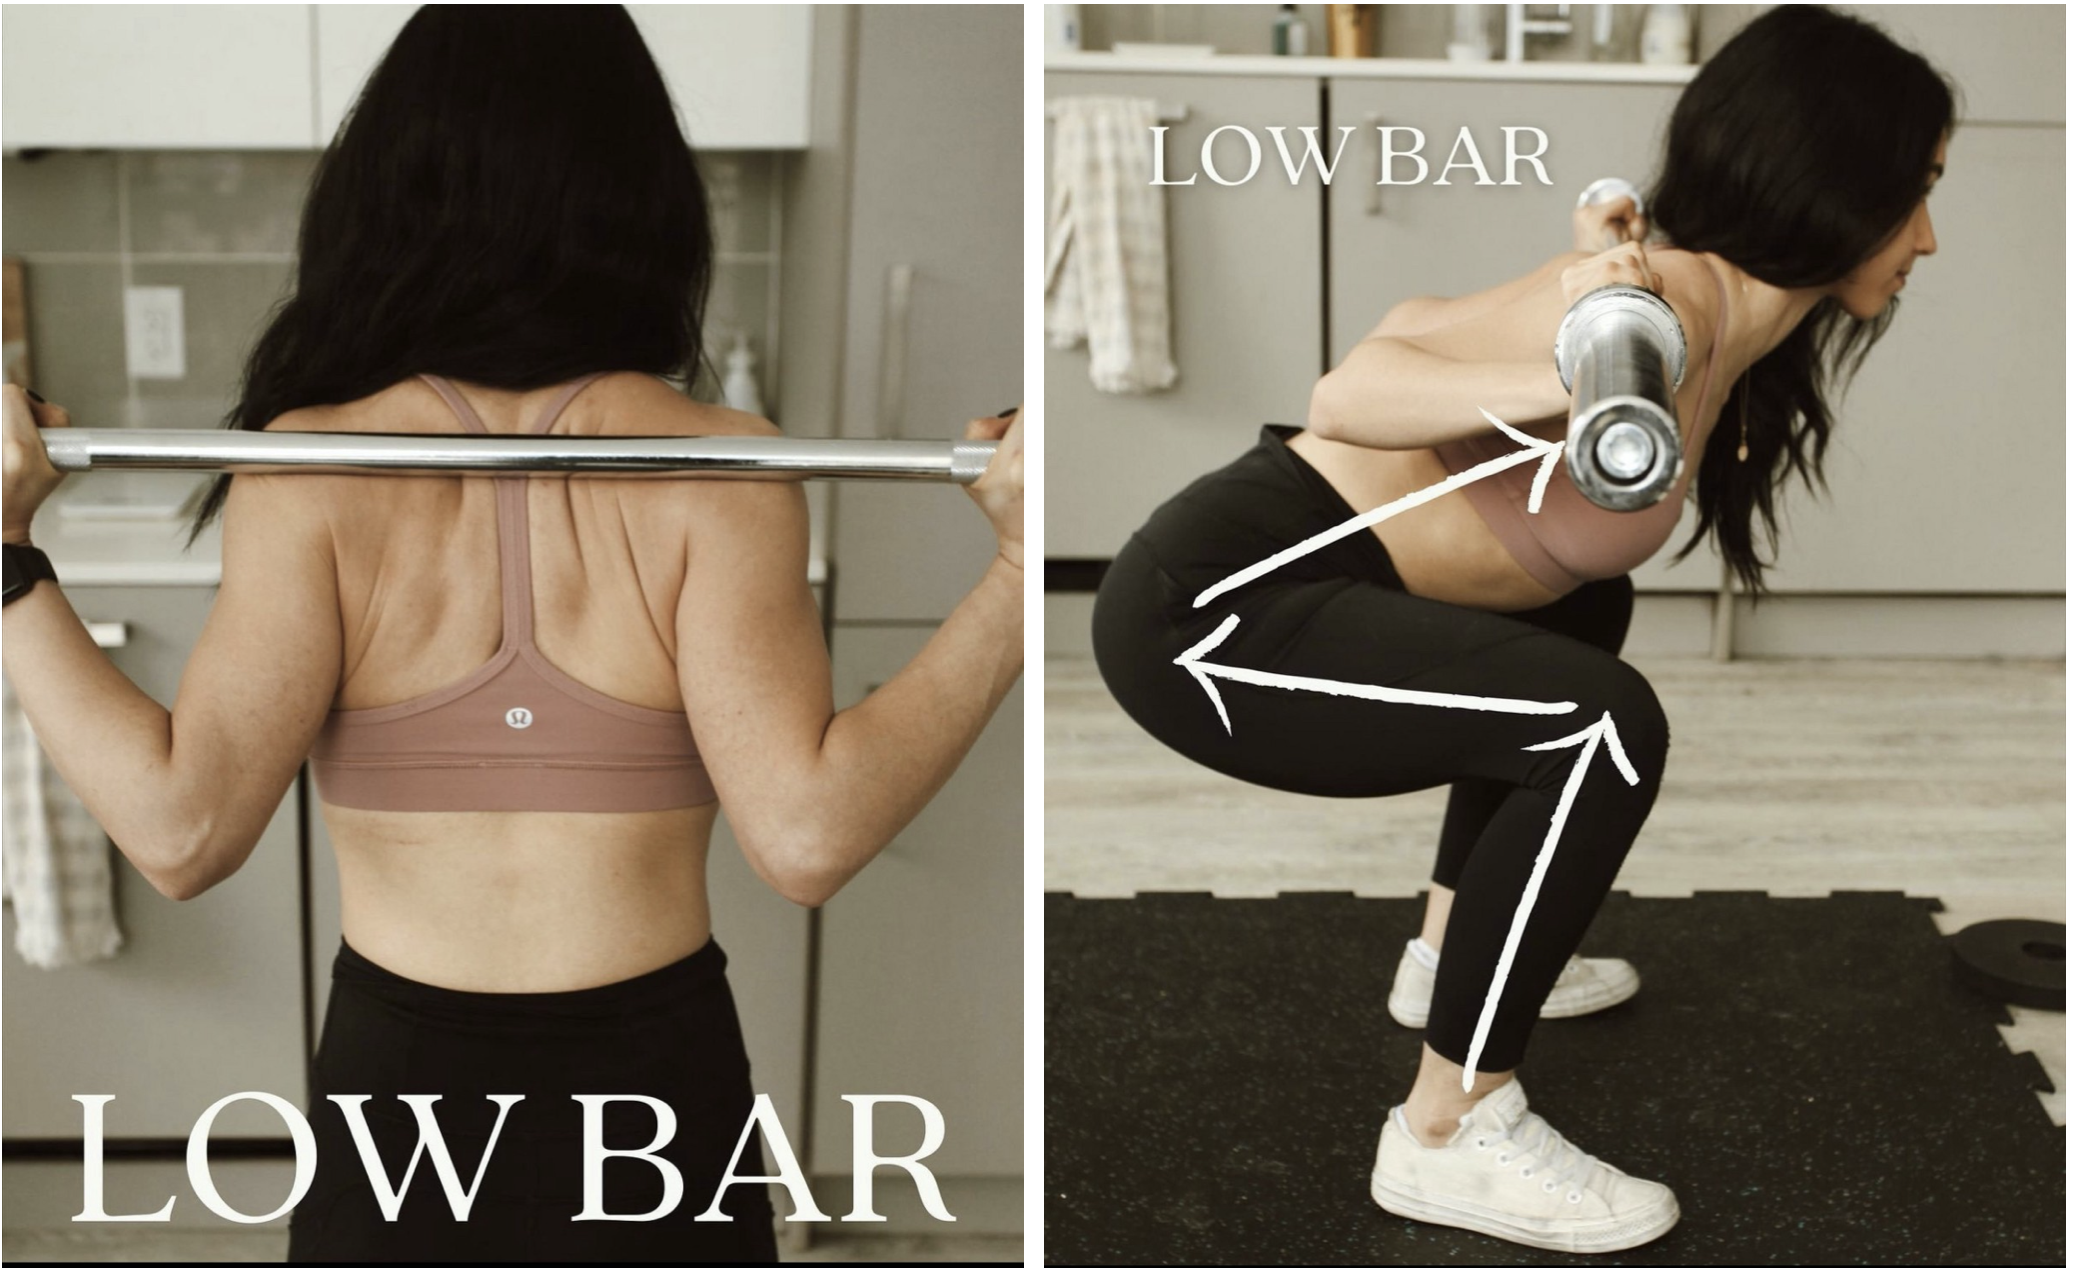
As you’ll see above, for the high bar position, the bar will sit higher on your back. It will sit on the upper trap muscles. If you have more muscle tissue there, it will help cushion it, but regardless it will usually be uncomfortable to start. After some practice, the nerves will desensitize and it will eventually be a non-factor for you. One thing to avoid though is to place the bar across the C7 spinous process. This is bony protusion on the lower part of your neck. So you want to avoid placing an iron bar on that bone. If you find it unbearable, this is often the issue. The low bar will sit more across your upper middle back and will use the rear delt muscles as essentially a shelf to sit on. One of biggest differences between the two positions is the changes in lever length. The high bar position will increase the lever length of your spine since the bar will sit higher on it. If you remember from the lateral raise figure above (the arm was the lever). The the larger the lever, the more the relative load is. So if both high bar and low bar squats had equal loads and equal forward torso lean, the high bar would place more load on the spine (especially lower spine) because it would be farther away. This is one reason most people can squat more with the low bar squat than the high bar squat. The high bar squat also demands you to be more upright for this reason. As if you lean far forward with the high bar position, it will be more challenging than if you were to lean with the low bar position due to the changes in lever lengths of the spine and the changes on how it will load the working muscles.
Fortunately, your technique will usually equate for this. The low bar position will commonly have more of a lean and the high bar position will typically have more of an upright torso for reasons I just said above.
There does seem to be some slight changes in muscle activity between the two as well. Showing slight increases in knee extensors (quads) and spinal erectors with the high bar and a little more glutes with the low bar. Which does make sense when looking at slight differences in biomechanics between the two.
Execution Of The Squat
Once you’ve found the bar placement, you’ll be good to squat.
Here are a few generalized cues to follow:
Keep your torso stiff and upright. Chest up tends to be a good cue:
In general with both bar positions, you’ll typically want less forward lean. The reason for this is because the more the lean, the more load you’re placing on the spine and hips and less on the quads. Your quads are a big strong muscle, so we want them involved.
2. Imagine sitting your hips back while driving your knees forward:
The squat is a mix of both hip extension and knee extension. So as you’ll see in the photo below, a combination of both driving your knees forward and sitting your hips back will help keep an efficient bar path. Of course you may be able to get more range of out either one of these movements, but that doesn’t mean you should avoid the lesser mobile one.
For example, I have limiting ankle mobility so driving my knees forward has more limitations than sitting my hips back. Regardless, I am still trying to drive my knees forward rather than just leaning into my more mobile hips. As if I did this, I would get more into a good morning squat and my quads wouldn’t be able to help much if at all.

As you can see in the pictures above, I am driving my knees forward while sitting my hips back at the same time. This will look different for everyone to some degree, but this cue is generally an effective one.
3. Drive your feet through the earth and stand up.
I like to keep my cues simple. Especially considering this is the beginners guide to the squat. Rather than overthinking it too much, I like to encourage people to simply drive their feet through the floor, hopefully through their tripod position.
You can see me do both the high bar and low bar squat below.
You may notice my low bar squat looks more natural than my high bar squat. This is because I mostly train the low bar squat so I am more skilled with the movement. The low bar position tends to fit my body and mobility better too. Pointing more to each individuals preference/execution of the squat.
If you find yourself doing the goodmorning squat (where your hips shoot back first) then a solid cue can be to imagine driving your knees forward on the way up to keep the quads engaged with the lift. Sometimes this is a sign of quad weakness though, so some quad accessory work can help along with specific practice of that cue.
At this point you have completed a squat. Congrats, you’re one step closer to becoming a fucking beast. Or whatever else you’re looking to get out of your squats (I do like to imagine that anyone reading this does want to become a fucking beast though… strength training bias much?).
The Front Squat
Lastly, we’ll cover the front squat. The front squat also uses a barbell, except the barbell is placed on the front of your body rather than the back (duhh). There are reasons and benefits to the front squat too. Neither are better, they just may serve different purposes.
Some evidence has shown the front squat will hit the quads a little more while puting a little less stress on on your hips/spine. Since the barbell is on the front of your body, this will change your a centre of gravity a little bit and you’ll typically have less forward trunk lean. As if you lean more in the front squat, you’ll just fall over. I will say, this isn’t something to obsess about. It’s key to remember that “stress on your joints” is not a bad thing. Your joints and muscles will adapt. But if for some reason, this is something you’re more concerned about, this can be useful information.
Finally, there is more specific carryover from the front squat. If you want to get into olympic lifting, then the front squat is a must. As it is how you catch and ascend on the clean.
There is only one bar position for the front squat and it is with the bar resting on your shoulders. The difference is in your hand/wrist position. If you have adequate mobility, then the front rack position is preferred. It’s the most stable and has the most carry over into the clean. In this position, the bar will rest across your front deltoids and your hands will come back to slide your fingers underneath the bar. You’ll want as many fingers under the bar as possible, but this takes more mobility. When I started, I could only have one finger and it was excruticating. Now I can easily have 3–4 fingers under the bar. If you cannot hold this position, but want this front rack set up, you can use lifting straps and hold onto the straps instead of placing your fingers under the bar.
The second option is crossing your arms over. This is often used with our less mobile friends (in which I often fall into that category) who also may have no interest in olympic lifitng. Bodybuilders and powerlifters could meet this criteria well. The bar will still rest across your front deltoids, but now your arms will just cross over to place your hands on the bar. There does tend to be less stability with this in my experience, but not to a meaningful degree.

Once you’ve found your wrist/hand position, let’s squat!
Here are some generalized cues for the front squat:
In addition to keeping your chest up, I like to focus on driving the elbows up.
Since the bar is on your front side, the bar is really driving your upper back into flexion. In the back squat, the barbell is resting on or closer to the upper back. In the front squat, there is more distance from the bar to your upper back, making this cue very important. So keep opposing that force by driving your elbows and chest up the whole time is crucial.
2. Keep your torso upright as you drive your knees forward on the way down.
This will most likely be how you naturally execute this movement anyways. As if you drive your hips back more, you risk just falling over. But I still think its valuable to remember. Some folks fear knees going over toes, so they avoid driving their knees forward. I promise you that your knees can go past your toes. This isn’t me saying you should drive your knees so far forward that your heel lifts up though. We don’t want to lose that base of support that the heel provides. So as you sit down, think of torso up and knees forward.
3. Once again, drive your feet through the floor and stand all the way up.
This is similar to the other squats. No need to get too technical here. Keep that torso upright and drive all the way up.
Congrats again! You have completed yet another squat at this point and have maybe even added another type of squat to your toolbox.
Summary & Final Notes
Here is a brief summary and some notes I wanted to share as I end this novel-like article.
The squat is a safe movement to train. Considerations are:
-Your own biomechanics and flexibility
-Your training status/history (not going from untrained to a heavy squat program)
-Your skill with the specific movement itself (front/back/goblet etc.)
-Your preferences and comfort (for bar position/type of squat)
-Your goals — the type of squat you prioritize should be impacted by your goals. (Example: if you want to get into olympic lifting, a low bar back squat is probably not preferred.)
If these considerations are met and are appropriately factored in, you are good to go. The main takeaway is that your programming makes sense for YOU.
2. Technique does matter, but it’s not the end all be all.
This may raise an eyebrow, but hear me out. Squatting is a physical skill. Which means it will probably start out ugly. Just as it does with learning any new skill. Don’t be afraid to make mistakes. Mistakes can actually be a valuable part of learning any skill. If your squat is wobbly, keep practicing. Perhaps even adjust to see if a different style or stance works better. The key here is practice. If you are a movement snob from the get go, you’ll probably just hold yourself back. With that being said, technique does matter. Maintaining certain positions will be ideal. I don’t recommend shooting for positions such as the goodmorning squat.. but in all reality it will happen from time to time. So don’t be a snob about it. If your form is “perfect” and “flawless” at all times, I’d argue you’re underloading your movements.
3. Squatting is a SKILL!
Do not expect to be fantastic off the hop. This will take practice and you will get better with time. Remembering this will help you not get too discouraged when you assess your lifts and notice the imperfections. Don’t get caught in this trip. Keep practicing and you will improve.
4. Everyones squat will look different.
Remember my stickperson figure. Squats come in all shapes and sizes. Don’t try to fit your squat into a box that it wasn't meant for. I wish I got this advice when I was 18. I spent years thinking there was something wrong with me because I couldn’t squat with my feet narrow and torso vertical. I will never be able to do that. I need to work within my own limitations and so do you. Make your squat better compared to YOUR squat. Not compared to someone elses seemingly “perfect squat.”
5. Have fun and fucking train hard.
Remember, you should find some enjoyment in your training. If you hate it deeply. Switch it up. You don’t need to squat heavy. There are plenty of benefits to it, but it isn't mandatory. You can do an endless amount of variations with a squat. Not all of which have to be with a barbell. So find a modailty that you enjoy and matches your goals. Then fucking work. This is the fun part!
I hope this answered any questions you may have had about the squat.
Happy lifting.
-Coach Dylan
References:
How to Squat: The Definitive Guide
https://www.strongerbyscience.com/how-to-squat/
2. Effects of range of motion on resistance training adaptations: A systematic review and meta-analysis
https://onlinelibrary.wiley.com/doi/10.1111/sms.14006
3.Effects of squat training with different depths on lower limb muscle volumes
https://pubmed.ncbi.nlm.nih.gov/31230110/
4.Effects of barbell back squat stance width on sagittal and frontal hip and knee kinetics
https://pubmed.ncbi.nlm.nih.gov/30230052/
5. The Effects of Barbell Placement on Kinematics and Muscle Activation Around the Sticking Region in Squats
https://pubmed.ncbi.nlm.nih.gov/33345183/
6. Kinematic and EMG activities during front and back squat variations in maximum loads
https://pubmed.ncbi.nlm.nih.gov/25630691/
7. Learning versus performance: an integrative review
https://pubmed.ncbi.nlm.nih.gov/25910388/