

The Beginner’s Guide To The Deadlift
Your Guide To Deadlifting Effectively And Confidently
The deadlift. Perhaps the most raw expression of maximal strength we have in the gym. Simply, the act of picking up something heavy off the floor. Just like our friend the squat, this movement too, has no shortage of controversy surrounding it.
Some say it’s the best strength exercise you can do, while some preach they’re a one way ticket to snap city.
Snap city: lingo that us meatheads use to infer something will hurt you.
I advise staying away from language like this. The deadlift is entirely safe, so there is no need to fear monger yourself into being afraid of them.
Regardless of what you believe about the deadlift, you most likely do them to some degree on a daily basis. They are practically an unavoidable daily movement. As anytime you pick something up off the ground, you need to execute some version of a deadlift to do so.
In this article though, we are going to be talking about the deadlift as an exercise. What you should know about it. Ways you can do it. Along with how you can apply it to your training regimen.
This is the beginners guide to the deadlift, so if you’re more advanced, there are better resources. I would start with Greg Nuckols’ Definitive Guide To The Deadlift if you’re looking for a very comprehensive resource.
If you’re a beginner or even an intermediate, this article should be plenty helpful to you, though. So let’s get to it.
What Is The Deadlift?
The deadlift is simple at face value. It requires picking something off of the floor and standing up. In the gym, this is commonly done with a barbell, kettle bell or dumbbell. There are different stances and techniques we can use to execute this as well. We will get to that later, but I just wanted to give a simple explanation to start.
One key difference with the deadlift, is that the initial rep has to overcome inertia without any ground reaction force or utilization of the stretch-shortening cycle of your muscles.
To put this simply, the law of inertia is an object’s resistance to changing it’s state. Since the barbell or whatever weight you’re using is just resting on the floor, you have to over come this from a dead stop.
An imperfect example of inertia is kind of like how the hardest task to do when you’re being lazy in bed, is usually the first one. Since it requires you getting your ass up. You (a human, not an object) are in a state of straight chilling. The task (such as doing laundry) requires you to overcome that state to do the laundry. In my experience, getting up to do the laundry is more daunting than doing the laundry itself. Then once I get going, it’s a lot easier to do the next task (say, washing the dishes) than it is to sit down and relax before getting back up to do the dishes. This is a very imperfect and not exactly transferrable way to look at inertia. Albeit an entertaining one.
This difference can also be seen in the squat. Yes, on the way down, you do need to overcome the inertia of the bar by changing direction of it, but as you descend under load, your working muscles will stretch under load and eventually use that energy to help contract out of the bottom to move the weight. This is referred to as the stretch-shortening cycle. This is something you do not get the benefit of with the initial deadlift, but you will get that after the first rep, especially if you touch and go and focus on maintaining control on the way down. If you’ve ever deadlifted, this is one reason why that second rep is often easier than the first. As well as if you “bounce” the bar off the floor, you will get a ground reaction force from that, that will help you lift it.
I generally don’t recommend this, as yes, you will be lifting the weight, but your muscles won’t need to actually do as much work in this context. So I am a big fan of reset deadlifts for this reason when doing a more conventional deadlift off the floor.
But… Are They Safe?
To address the idea that deadlifts are dangerous. As I mentioned before, you do some form of a deadlift everyday without realizing it. If you pick up a laundry hamper, you’ve done a deadlift. If you pick your child off the ground, you’ve done a deadlift. The deadlift is not contingent on technique, it’s contingent on the task. And the task is picking something up off the ground. In fact, you can deadlift with very similar lower body joint mechanics as you squat, but the key difference is picking up the object (barbell, hamper, would say child, but they’re not objects) from the ground.
I am actually willing to bet you do things such as pick the laundry hamper off the ground without any care for technique, most of us just round at our spines to do so. Which maybe to your surprise, does not concern me too much. Picking up very low load object off the floor without focusing on form is most likely not a concern. It’s just not something you want to get into the habit of as you start to lift heavier.
In regards to safety, allow me to try an ease your potential concerns. Strength training is actually a safe acitvity when compared to most other sports. One paper found an injury instance of 0.24–1 injuries per 1000 hours of body building, along with 1–4.4 injuries per 1000 hours of powerlifting.
We can compare that to a paper that found an injury instance of 9.8 per 1000 hours in senior basketball players, both male and female over a competitive season. So compared to playing a team sport such as basketball, strength training is quite a bit safer in regards to injury risk. Since we’re talking deadlifts, the comparison of the powerlifting stats is probably more applicable since powerlifting requires heavy deadlifting, while bodybuilding does not — even though it often involves it to some degree. This also makes plenty of logical sense. When you strength train, you control the variables. You pick the load, the exercise and can practice the form. With sport, you’re having to react to a other people and objects coming at you. You’re reacting to the variables. Which for safety reasons, I’d prefer to control the variables than always be reacting to them. Just one reminder I’ve also found valuable in easing people’s concerns about strength training.
Working Muscles Of The Deadlift.
Now that we have a basic understanding of what a deadlift and adressed that they are generally safe, let’s get to the understanding the basic working muscles of the deadlift.
The deadlift is a compound movement that has some level of engagement with a countless amount of muscles, so we’re going to simplify here. This is the beginner’s guide to the deadlift after all.
We’re going to look at the primary/secondary movers and the stabilizers in the this article.
Primary Movers (agonists)
An easy way to understand what the prime mover is, is to think about which muscles literally act the most on the joints needed to complete the lift. Now obviously, you’re holding onto the weight with the deadlift, but your arm muscles can’t actually do much to initiate and complete the task of the deadlift. They play an important role, but they cant be used to stand up with the weight.
The key prime movers in the deadlift will most often be the large hip extensors. The glute max, the hamstrings and the adductor magnus. An easy way to think about hip extension is to imagine pulling your thigh bone away from your pelvis. As you lower into the deadlift, your thigh bone gets closer to your pelvis (hip flexion), then to stand up, your hip extensor muscles (listed above) pull on these bones to move. In the case of your hip extensors, they pull on either your thigh bone (femur), your pelvis or even your shin bones (tibia, fibula)in the case of your hamstrings to take you out of hip flexion and stand up. So this is what I mean when I say hip extension.


The glute max is also known as your largest butt muscle, also referred to as your booty.
The glute max is often your strongest hip extensor, making it quite crucial with the deadlift. Unlike the other two hip extensors listed, the glute’s main action is hip extension. This means the only significant way to load and train the glute max is through training hip extension.
The hamstrings will also extend the hip. The only caveat is that they will bend the knees as well. So the more you bend your knees to get into the bottom position, the less your hamstrings can contribute. Since they will be lengthening as you flex the hip but also shortening as you flex the knee, giving them less ability to produce force and help with hip extension. This is often why even though squats require hip extension , they don’t seem to grow your hamstrings because they also require plenty of knee flexion. So the more you bend the knee to execute the deadlift, the less of a primary role the hamstrings will play.
Finally, the adductor magnus is also a key hip extensor. It’s two primary actions are hip adduction (pulling your thigh bone toward your midline) and hip extension. The adductor magnus will be involved in all deadlifts because it is a strong hip extensor, but to get even more adductor magnus, a wider foot stance or sumo stance will do so.
Secondary Movers
The quads are what we are going to qualify as the main secondary mover in the deadlift for the most part.
All quads will extend the knee. The rectus femoris (one of the quads) will also flex the hip, so it won’t be contributing as much here either. Similar to the hamstrings, it is biarticular (meaning it crosses two joints). The rectus femoris will extend the knee but also flex the hip. So as it shortens and on the way up in the deadlift from knee extension, it also lengthens from the hip extension, largely making it unable to produce much force.
The other quads only contribute to knee extension, so they will be involved on the way up. The reason they are secondary movers is because deadlifts tend to be hip dominant than knee dominant. This can be different for each individual though. The more you bend your knees to get to the bottom position, the more quads will be involved. The only issue that you’ll see is that deadlift technique generally won’t encourage you to engage in more knee flexion in the set up. So quads will still mostly be a secondary mover. In other words, don’t expect sick quad gains from your deadlifts.
Stabilizers
Since this is the beginner’s guide to the deadlift, we’re only going to focus on two main stabilizers here. The spinal erectors and the lats.
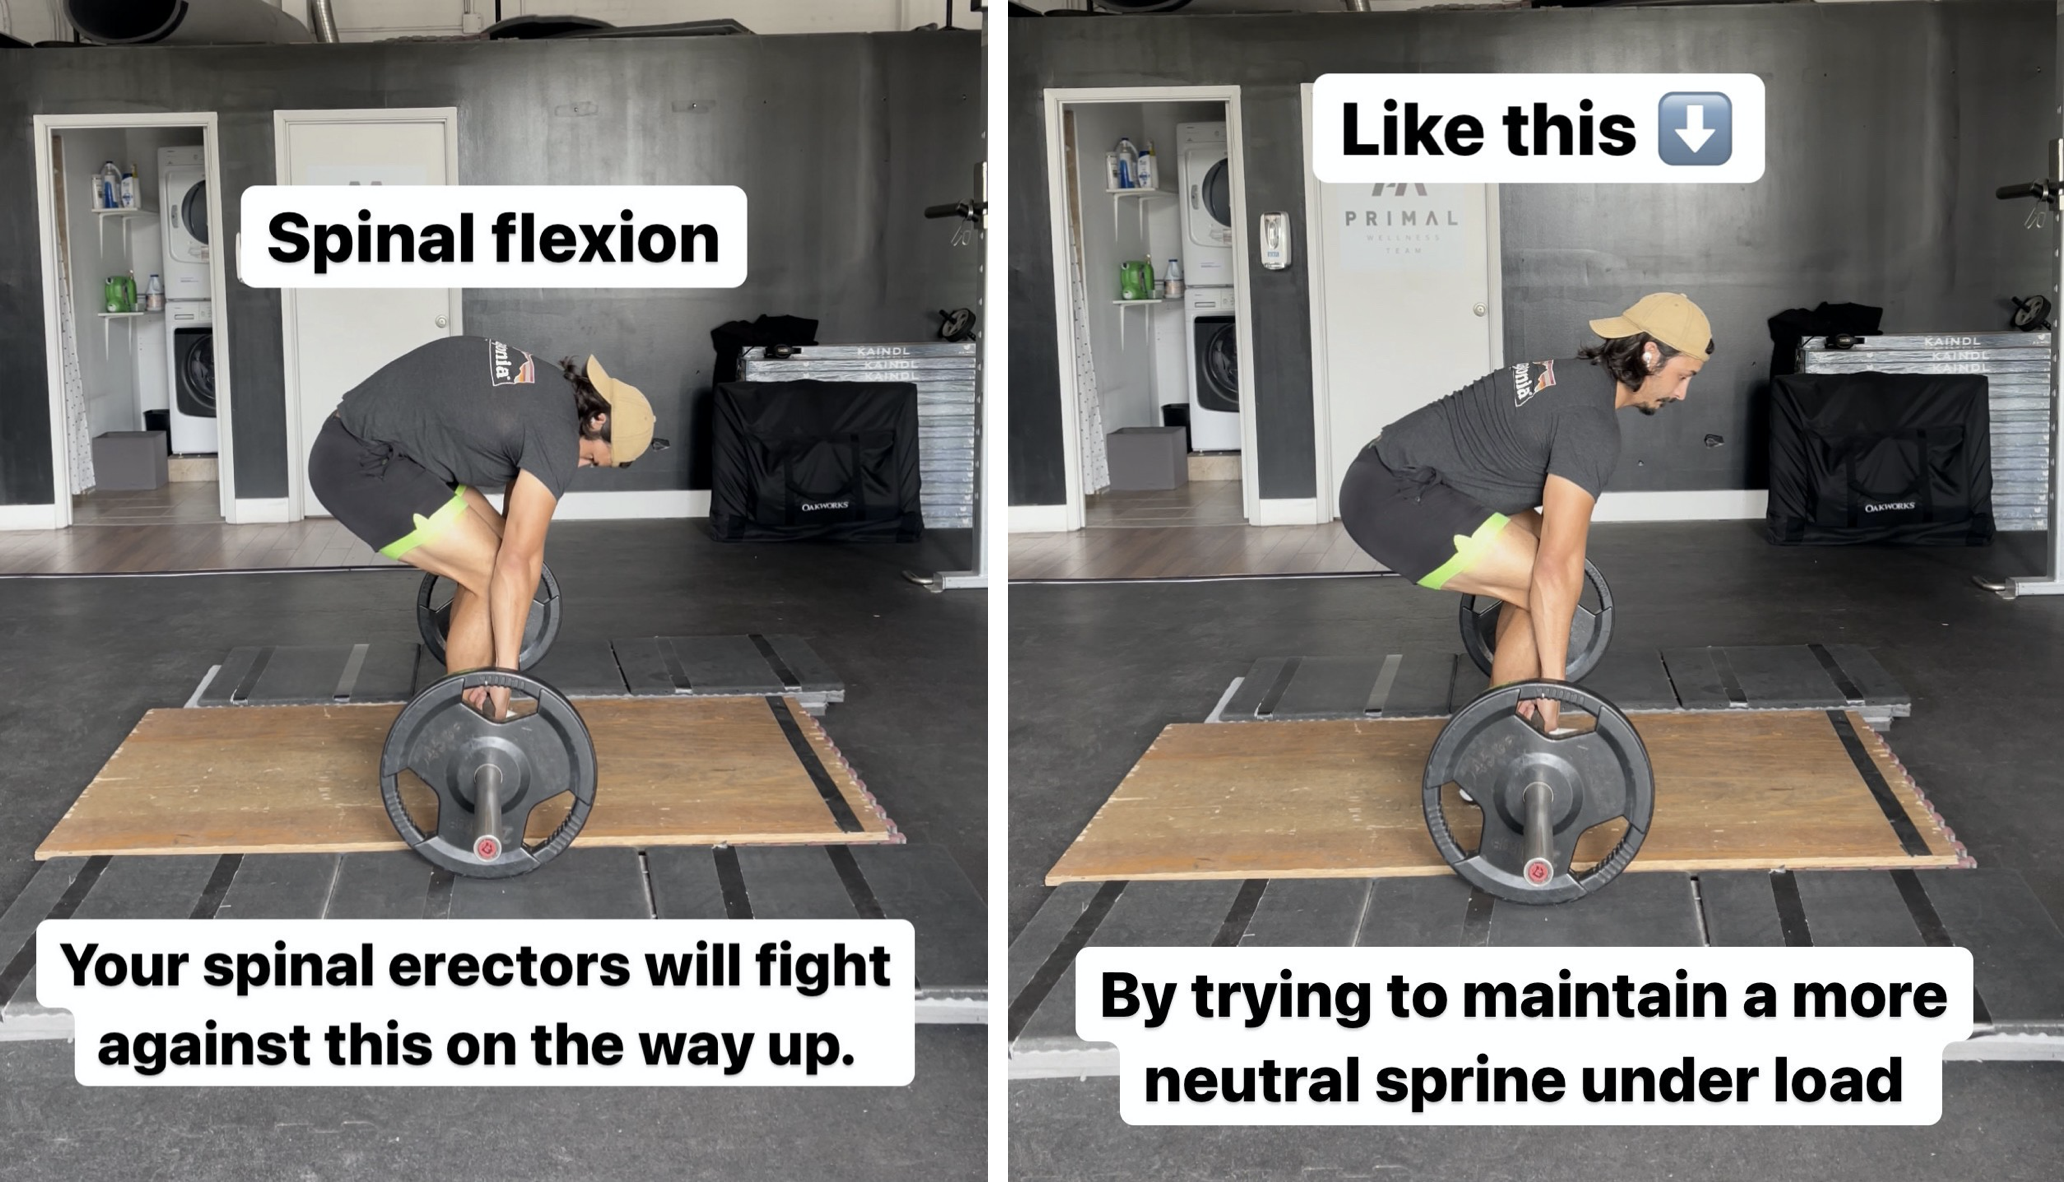
The spinal erectors will work to fight against spinal flexion on the way up. The load and line of force(barbell + gravity) will be working to force your spine to round, it is your erector’s main job to fight against that. Spinal flexion is not an inherently dangerous thing. It’s just is not the most efficient way to execute the deadlift. Keeping a rigid and stiff spine will allow your spine to stay stable as your lower body muscles work to stand up with the weight. If you round out a lot, then your spinal erectors now have to actually contract to straighten your spine back out to finish the lift. So similar to the squat, your spinal erectors and trunk stabilizers as a whole will work to keep your spine stable and help you complete an efficient deadlift.
The Lats are another crucial stabilizer in the deadlift. The main reason is because one of the lat’s main functions is to bring the arm toward the body in the sagittal plane, otherwise known as shoulder extension. If you imagine your arm being in front of you, your lats are big contributors to pulling your arms to your body. This matters a lot in the deadlift. Since you are trying to keep the barbell close to your body on the way up, your lats and other shoulder extensors need to contract in order to do so. The farther the barbell travels away from your body, the more the relative load will be on your spine (especially lower spine) and hip extensors. This will make the deadlift significantly harder to do. Making the lats a key stabilizer.

This covers the biggest muscles in the deadlift, so let’s move on to how to do the deadlift!
Deadlifting Considerations
There is not a uniform way to deadlift. The only must is that you lower your body to pick something up and stand up. As I had mentioned before, there are countless ways to do that. There are different stances, techniques and styles of deadlifting. Each one may be more appropriate for certain bodies and for certain goals. Let’s get to it.
Bar Path/Centre Of Gravity
One way to figure out a great deadlift stance for you is to figure out a comfortable stance along with a decent bar path. As mentioned above, I generally don’t recommend a lot of knee flexion with a barbell deadlift. As the barbell will literally have to move around your knees on the way up, making it a less efficient path.
An efficient path would look like one where the barbell mostly travels up in a straight line. Similar to a jab in boxing. The most efficient deadlift is one that travels up and down in a straight line. This is what we call the bar path. Since the deadlift is a free weight exercise, the barbell + gravity is the acting force on your body and joints. The weight will always be the weight (say 100lbs) but that load can relatively change for the working muscles. So if the bar travels farther from the joint being loaded or the joint travels farther from the barbell, this will result in an increased amount of load on your joints.
How Working Muscles Are Loaded & Biased
Let’s use an example of two diferent styles of deadlifs to illustrate. We’ll compare a hip dominant set up (conventional) vs. a more hyrbid set up, which involves more knee flexion. You will see below that in the hip dominant set up will have the hip joint farther from the line of force. Which will be a straight line down from the barbell. This will load the glutes/adductor magnus and hamstrings more. A hybrid stance will be a still mostly hip dominant, but the hips will be a little closer to the line of force and the knee will be farther from the line of force (in front) than in the conventional stance, which will put more load on the quads. Also as we talked about above, since the hamstrings are both knee flexors and hip extensors, the hybrid stance will use less hamstrings. Less knee flexion will allow for the hamstrings to be utilized more.
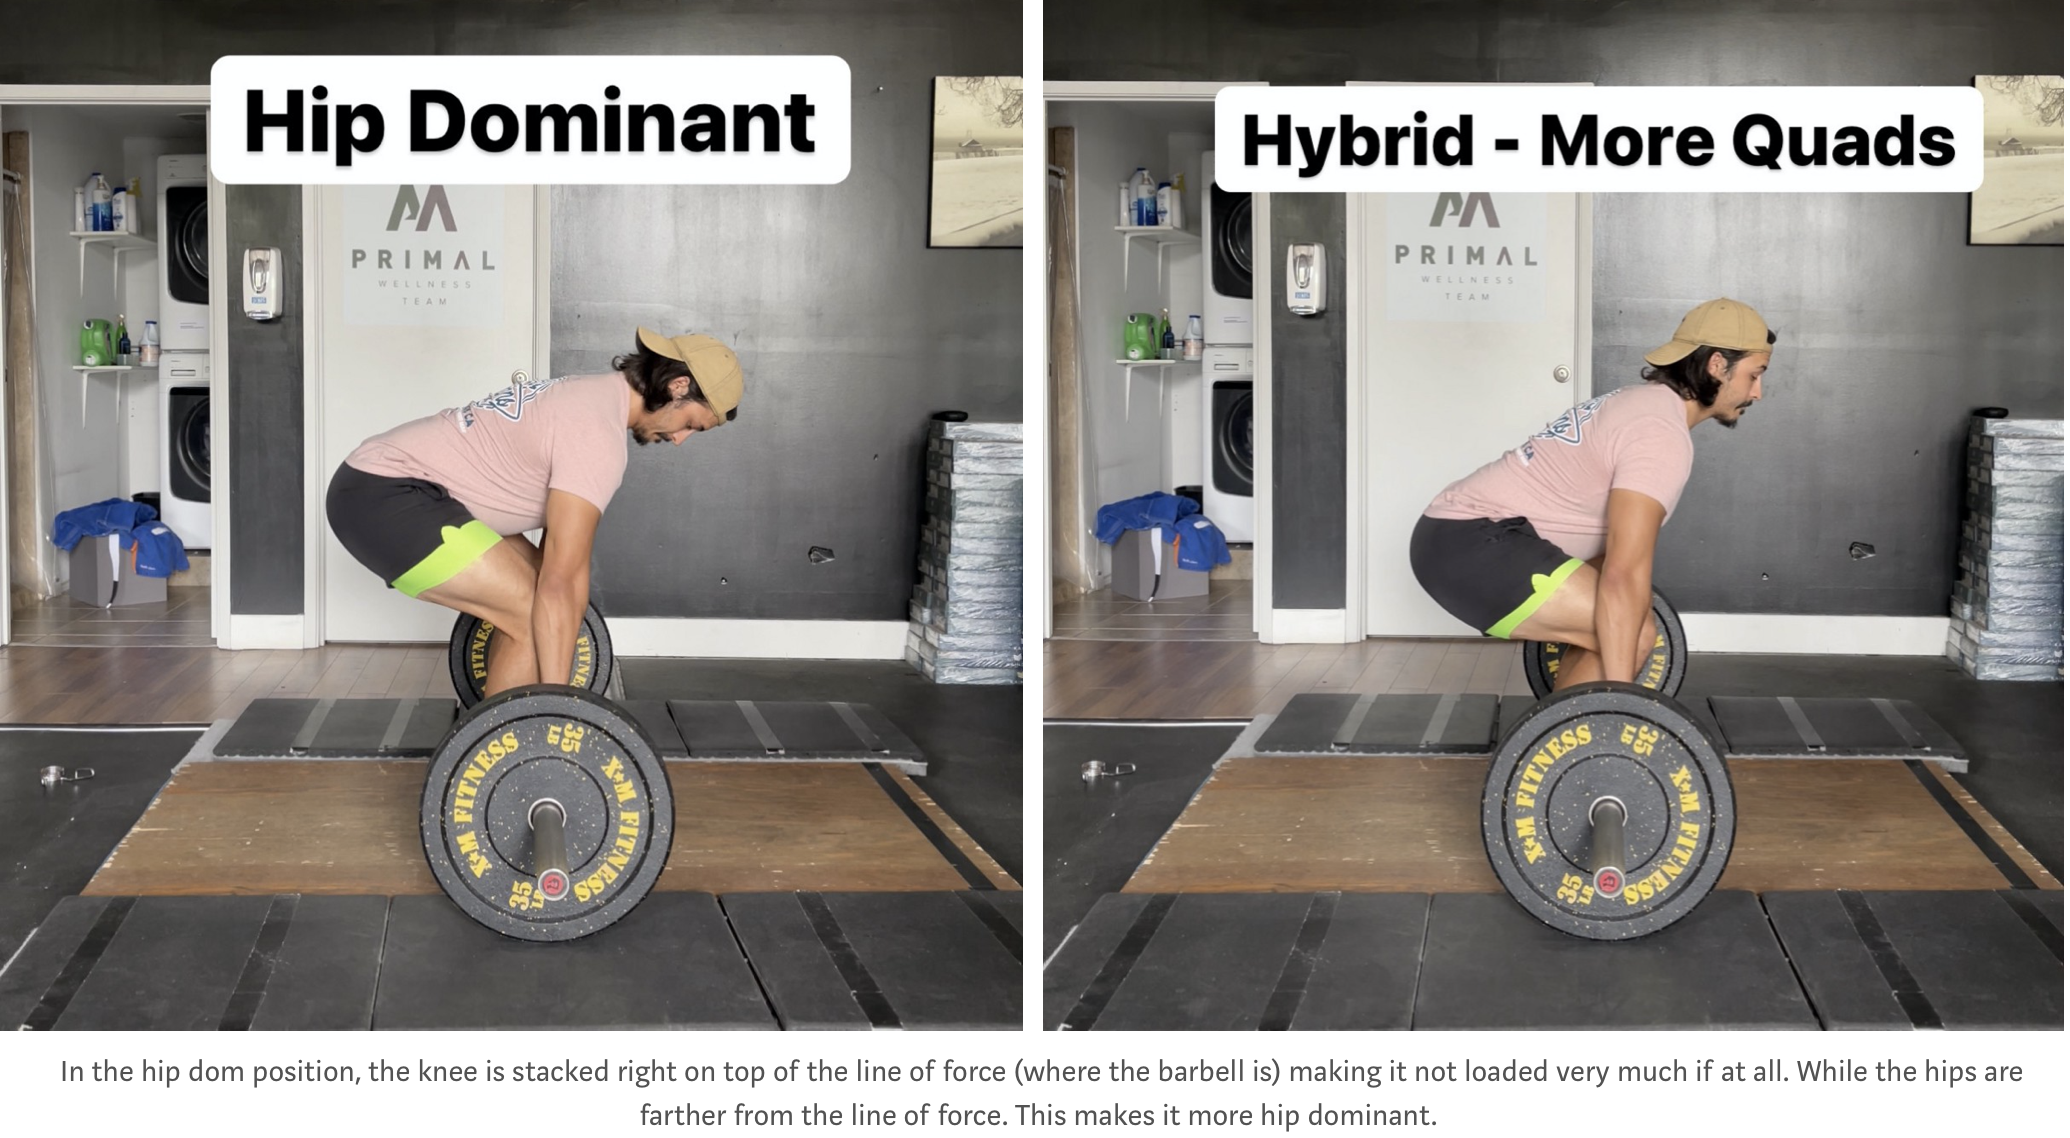
The total weight will be the same in all stances, but the amount of load placed on the given joint will depend on the distance of from the joint to the line of force. So if you hips are farther away from the barbell, it will increase the amount if load on the hip extensors. If the knee travels in front of the bar, same thing.
One more thing on this regarding spinal flexion. One other reason we aim to keep a neutral spine is because it will help increase the load and keep most of the tension on the lower body muscles. If your spine does round out a lot, it can relatively shorten the length of your spine. Since your spine connects to your hips, this would reduce the amount of load placed on the hips. You may think this would make the lift easier, but it also makes your spinal extensors have to work more. Since your hip extensors are going to be bigger, stonger muscles, we’re going to aim to have them to more work rather than your spinal erectors. Also, from an aesthetic perspective, I think most of us want more booty gains than spinal extensor gains.
How To Deadlift
Now we’re going to move onto the “how to” component of this guide. Since this is the beginner’s guide, we’re going to keep it simple and just touch on three types of deadlifts.
Conventional Barbell Deadlift
Sumo Barbell Deadlift
Trap Bar Deadlift
We’re going to cover how to set up for each lift. How to execute each lift. Reasons why you would focus on one or the others. Cues that can help you execute each one and finally, share some videos from our exercise library on how to do each lift.
The Conventional Barbell Deadlift
When it comes to the set up for the conventional deadlift, I’m going to to teach you a set up that will put you in more of the hip dominant position rather than the hybrid.
1. Foot Placement
I’m not a stickler for hard rules around foot placement, but typically for the conventional deadlift, your feet will be around hip to shoulder width apart. Once you start going wider than that, you’re entering more a of a hybrid sumo stance to full on sumo stance.
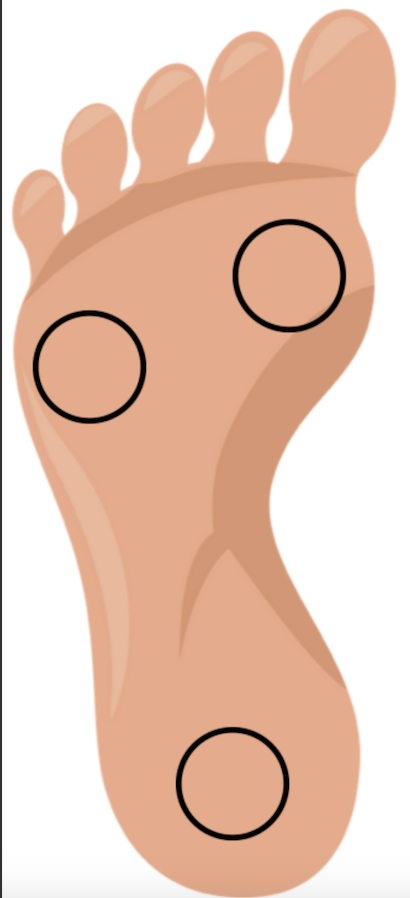
One thing I do remind with foot placement is to maintain the tripod of the foot connected to the floor. The heel, the ball and just under the pinky toe. These three spots are important to keep planted for stability as it’s going to be easier to produce maximimal force into the floor if your feet are firmly planted into it.
2. Set Up
From there, you’re going to sit your hips back first while trying to keep your shins decently vertical. This will be putting you into hip flexion, which will start to load your hip extensors we’ve been talking about (glutes,hams,adductor magnus). You’ll want to do this while keeping your torso stiff. Once you’ve reached your end range, you’ll want to reach down to grab the bar. This will require varying degrees of knee flexion based on the individual. Which is totally okay. This set up just emphasizes hip flexion first. If you have great hip flexion or relatively long arms, you may need very little if any knee flexion to grab the bar.

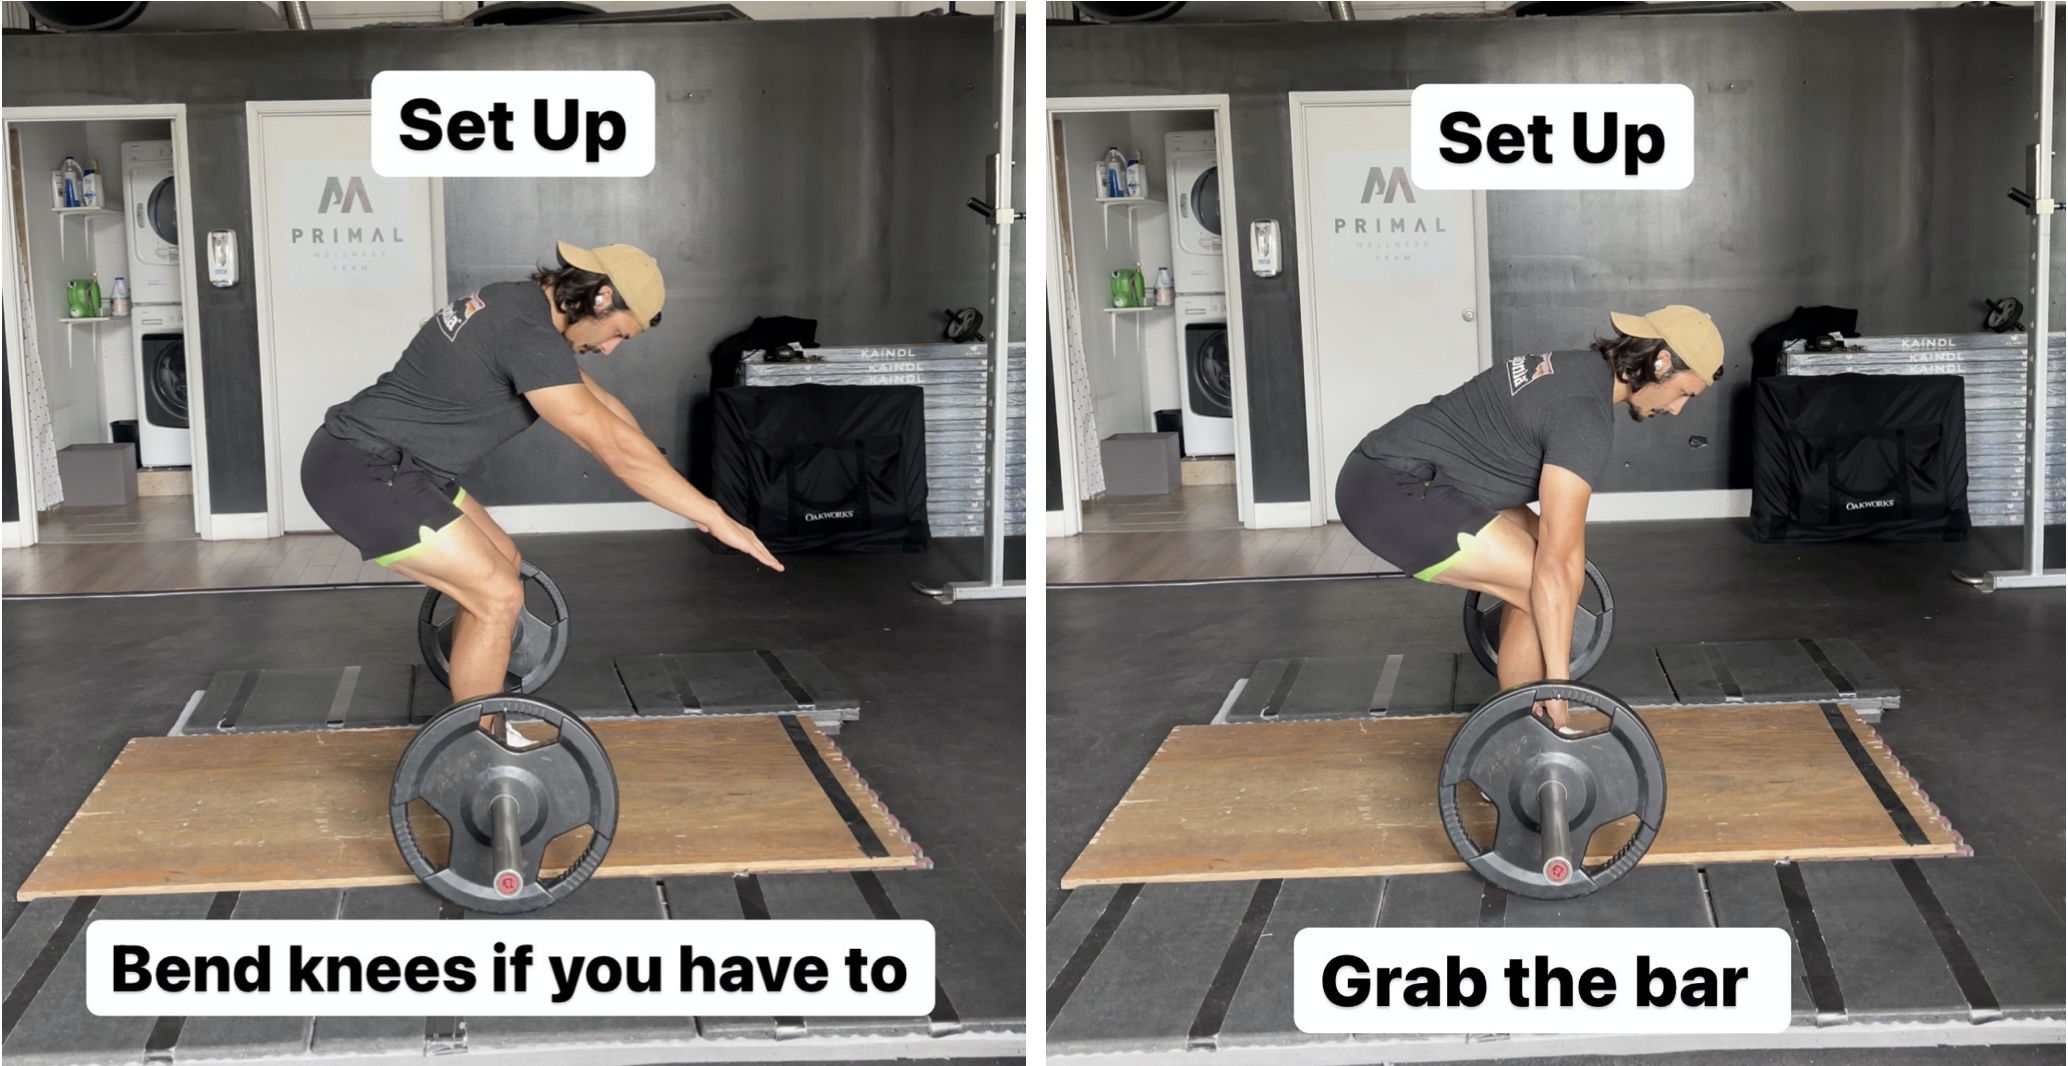
3. Creating Tension & Taking Slack Out Of The Bar
Next you’ll want to create tension in your body and take the slack out of the bar. Similar to taking slack out of a rope. If there is slack in a rope, once force is placed on it, the slack will be “yanked” out of it. In this context, your joints and muscles will be yanked on if you try to deadlift with plenty of slack in your set up.
So grab the bar from your set up position, keep your arms fully locked out, and get your spine stiff. You can almost imagine getting your spine long or even imagine there is a string at the top of your head and someone it pulling on it to lengthen your torso.
From there you should feel plenty of full body tension and be ready to drive those feet through the floor.

4. Stand Up & Lock Out
One cue that changed how I deadlift and teach it was being told to push through the floor. Essentially once you’ve got your torso in place, taken out the slack and have that stiffness locked down, imagine just pushing the earth away from you with your legs and standing up straight.
This cue can really hip with focusing on producing force through the floor from your lower body, while maintaining that stiffness in your torso.
Then I have to somewhat crass cues I like to lock out.
1. You can imagine bringing your hips through to almost hump the bar
2. You can imagine there is a credit card between your butt cheeks and you’re trying to pinch it.
Both cues will help you drive your hips through in your lockout and squeeze your butt in the process.
From there you can touch and go or take a slight pause in between reps. Both have their use! One thing to just be aware of is not relying on the bounce too much as mentioned above.
The Sumo Barbell Deadlift
Next up, we got the sumo deadlift. Full disclosure, this will include a bit of a tangent, so bare with me as I do think it’s important to undertstand some key differences in the sumo deadlift. Especially surrounding glutes.
The sumo deadlift is often said to be more glutes than regular deadlifts. Which doesn’t actually seem to be true. The only way I do see this is because there is some hip abduction in the sumo deadlift (abduction is easy to remember because its when something moves away from your body, ie. abduction). As you descend down into the sumo deadlift, your thigh bones will move away from your hips in the frontal plane (sideways). Now, your glute minimus and medius (the smaller butt muscles) are hip abductors, so they will be involved in this. Here is the kicker though, the sumo position is a really poor position for them to be able to produce force in and get a good training stimulus from. If you wanted to train and grow your glute minimus/medius, you’d actually want to load it it’s lengthened position, which would be adduction. In fact, one paper showed about 3 times less force being able to be produced from the more shortened position of the hip abductors when compared to being in the lengthened position. Now it gets even worse for hip abuctors. The only force they are producing during the sumo deadlift is actually from friction, not from being taken through a range of motion.
They aren’t actually being loaded through their range of motion. That would require the hip to start in adduction and then be pulled into abduction. A side lying leg raise comes to mind here.
Instead, there are horizontal forces at play in the sumo deadlift that aren’t nearly as present in a conventional deadlift. What I mean by this is that you’re actually driving your feet a horizontally during the sumo deadlift. Which will send back a ground reaction force that will be taken on by the hip abductors. This is similar to a wall sit. If you do a wall sit and try to push your feet away from your body, you’ll feel it more in your quads. This is because of the friction force being generated by trying to straighten your leg. If you were on ice and tried to do so, you’d straighten out immediately and fall on your ass. Similar to if you tried to do a sumo deadlift on ice, you’d collapse down into the splits and probably tear your adductors. But since we’re on a stable surface, we can use that as leverage to generate more force. Which is exactly what we’re doing with the sumo deadlift. We’re leveraging that friction to generate more horizontal force to aid in the lift.

What is confusing, is that this friction force can give great feedback even if it’s not going to create amazing stimulus for growth. The wall sit is the best example here. You may feel wall sits way more in your quads than you feel them even in a squat. Yet, squats are still going to be better for growing your quads. Mostly because you are taking your quads through a range of motion under load. Loading it in it’s lengthened position and having it produce the most force to move the load through space. Wall sits do none of this. Just like how sumo deadlifts don’t do much of this for your glute minimus and medius, even though you may “feel” a lot going on in your glutes while doing a sumo deadlift. In reality, you’re just feeling a lot of tension in your smaller glute muscles and even piriformis (another small hip abductor) from the horizontal force you’re driving into the floor.
Now that that’s out of the way, let’s talk about some other differences from the sumo deadlift. In general there does seem to be more quads in the sumo deadlift than in the conventional deadlift. There has been higher quad activation via EMG in sumos when compared to conventional deadlifts and there has been greater knee joint moment arms seen in the sumo when compared to the conventional deadlift (which just means the quauds will be more loaded). Interestingly enough though, similar hip extensor activation was seen between both and similar hip joint moment arms were calculated too (which just means your hip extensors, especically glutes are similarly loaded in each). Leading us to believe there are similar demands on the hip in both movements. So sumo deadlifts are moreso “same amount of glutes” than they are more or less glutes. Except the sumo deadlift is also more adductors and more quads, so I may even dare say that sumo deadlifts may be less effective to developing glutes than a more conventional deadlift since the other primary and secondary muscles will be doing more work.
One other variable (as mentioned above) is that there is going to more adductors involved in a sumo deadlift than in a regular deadlift. The adductor magnus is going to be involved heavily in both, but it’s logical to believe it would be more involved in the sumo since it will be lengthened by hip flexion and hip abduction on the way down compared only really being lengthened by hip flexion in the conventional deadlift.
Now that we got some of the basic biomechanics of the sumo deadlift out of the way, let’s get to the execution of the sumo deadlift!
1. Foot Placement
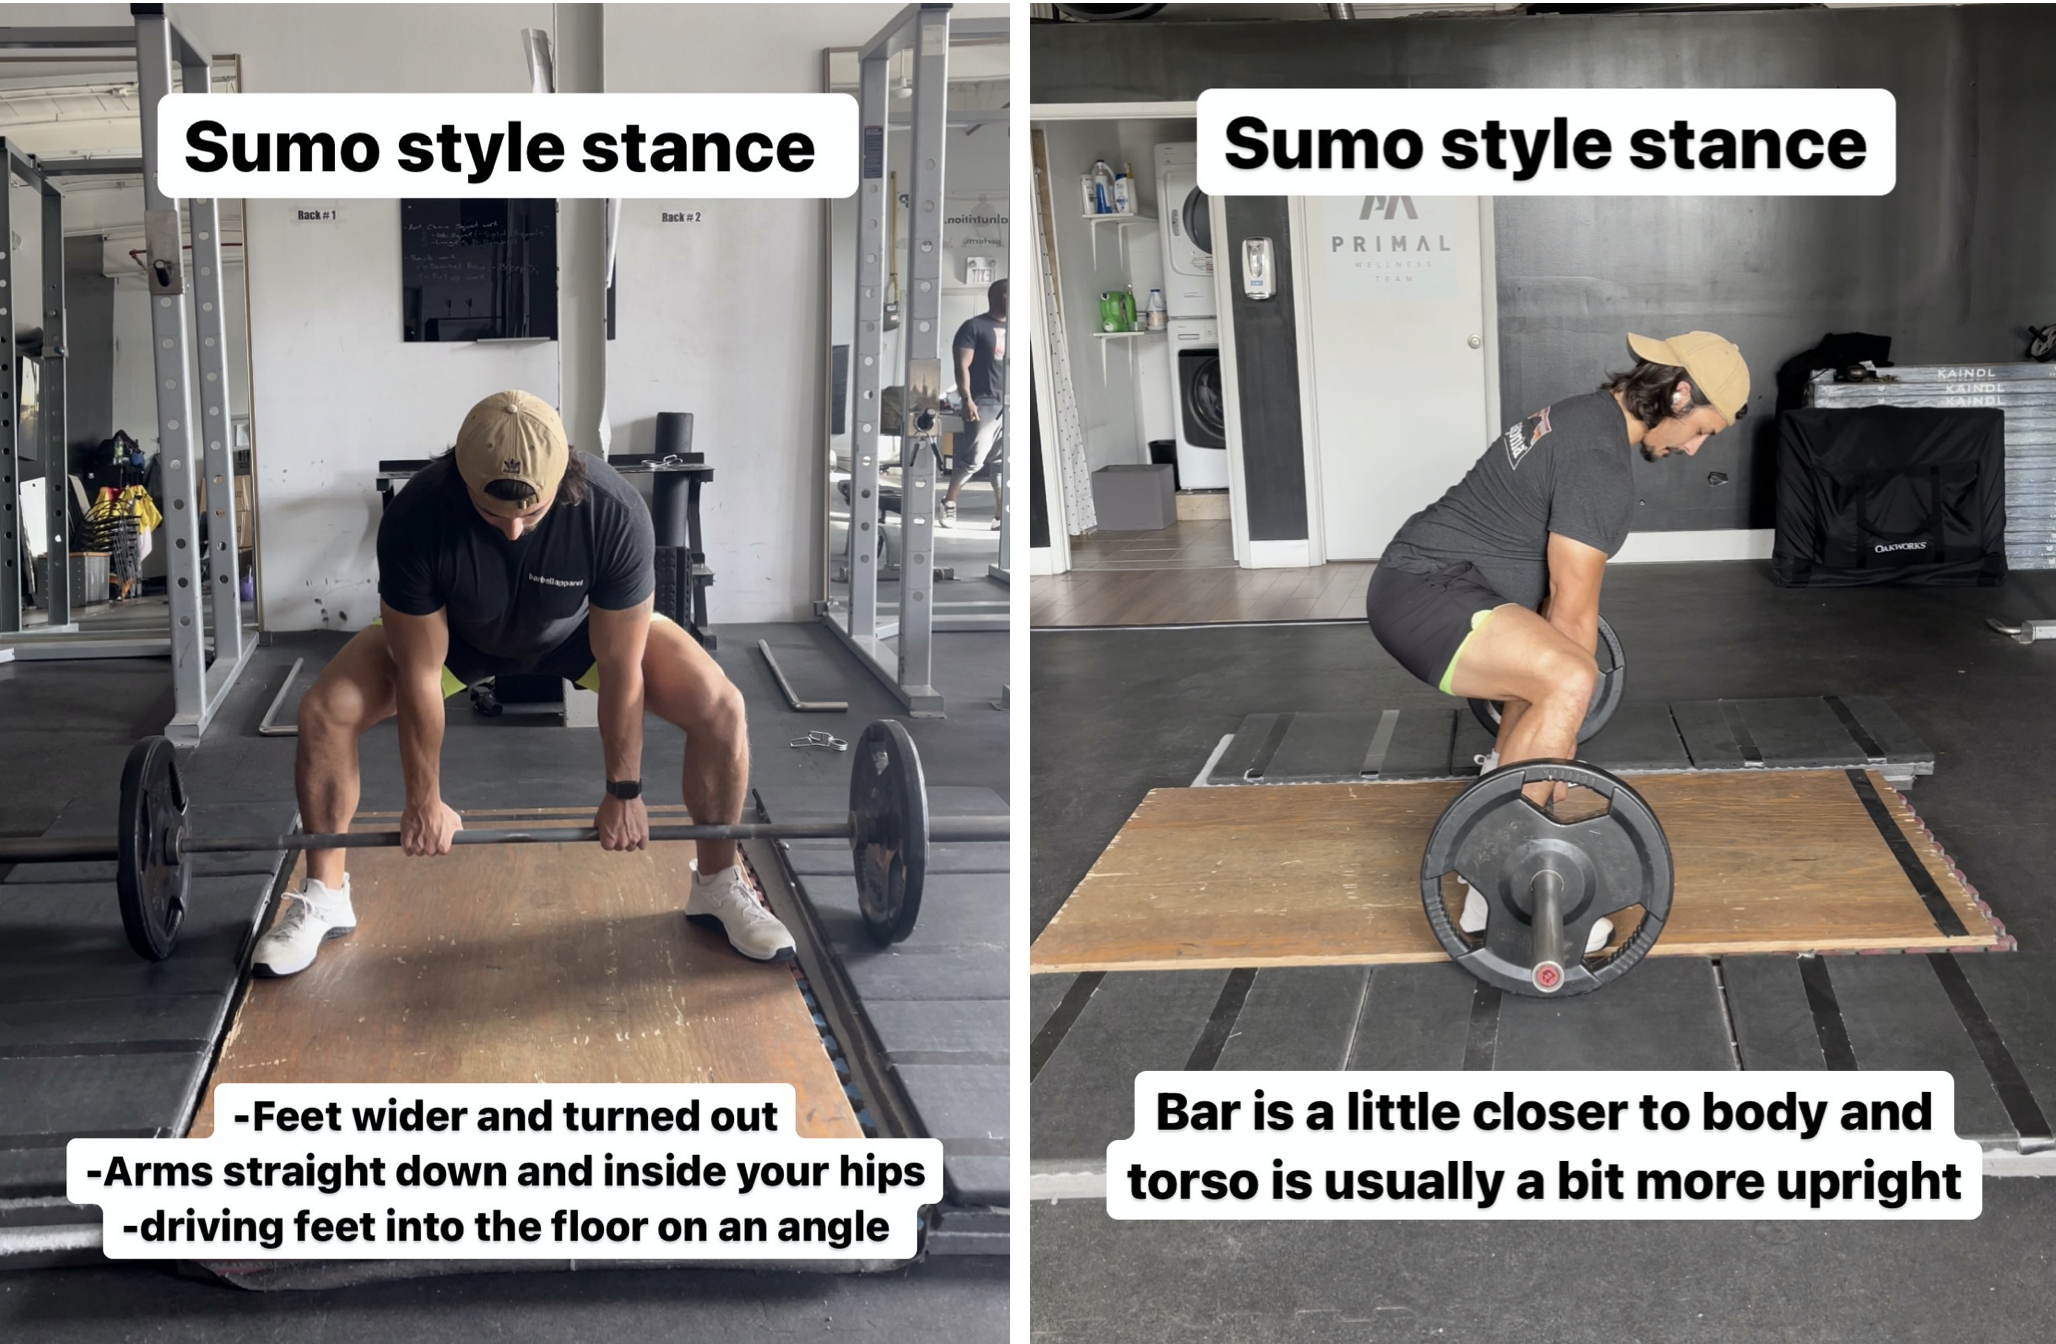
Similar to the conventional deadlift, we still want to make sure that your tripod is firmly planted. Now, the foot placement will be quite a bit different with the sumo deadlift than with other deadlifts. Hence the name, you will be in a wider sumo style stance. Typically this will be outside of shoulder width. I am not a stickler for exactly where, as I encourage you to find a comfortable spot in that wider range. From there, your feet will also be more turned out than normal. Again, there is range to play with here. I just advise not trying to keep your feet perfectly straight with this wide stance. Doing so will be uncomfortable as hell and well only put unnecessary rotational forces up to your knee.
2. Set up
Once you’ve found your foot placement, it’s time to get into your initial deadlift position. The set up for the sumo deadlift will be slightly different. The hip demands tend to be similar to the conventional deadlift, but the torso also tends to be more upright and the knees also tend to be more bent in the bottom position.
So I usually teach a similar set up to the conventional but the outcome will still look different because of the wider stance.
Step 1 is to sit sit your hips back. Step two is to bend your knees so that you can grab the bar. Step three is just to grab the bar while keeping your arms locked out and straight.
3. Execution
Execution will also be similar with to the conventional deadlift. You will want to take all the slack out of the bar by creating full body tension and then stand up and lock out.
One key difference here is that you’re not going to be driving your feet through the floor in the same way.
You will be driving your feet through the floor, but with additional horizontal force. Remember if you were to do a sumo deadlift on ice, you’d fall into the splits because you will be driving your feet through the floor in that angled direction.
Then, just like the regular deadlift, stand up while keeping that tension and drive through your hips to get that full lock out!
The Trap Bar Deadlift
The last version we’re going to talk about is the trap bar deadlift. The trap bar deadlift might be one of the more underrated deadlifts, especially when considering the trap bar variations you can use.
For example, to hit more quads, you can definitely do a heel elevated trap bar deadlift. This would not be feasible with other styles of deadlifts as a heel lift would contribute to more knee flexion and your shins would just run into the bar making you have to maneuver the barbell around your knees. The trap bar allows for this variation and I am fan of them.
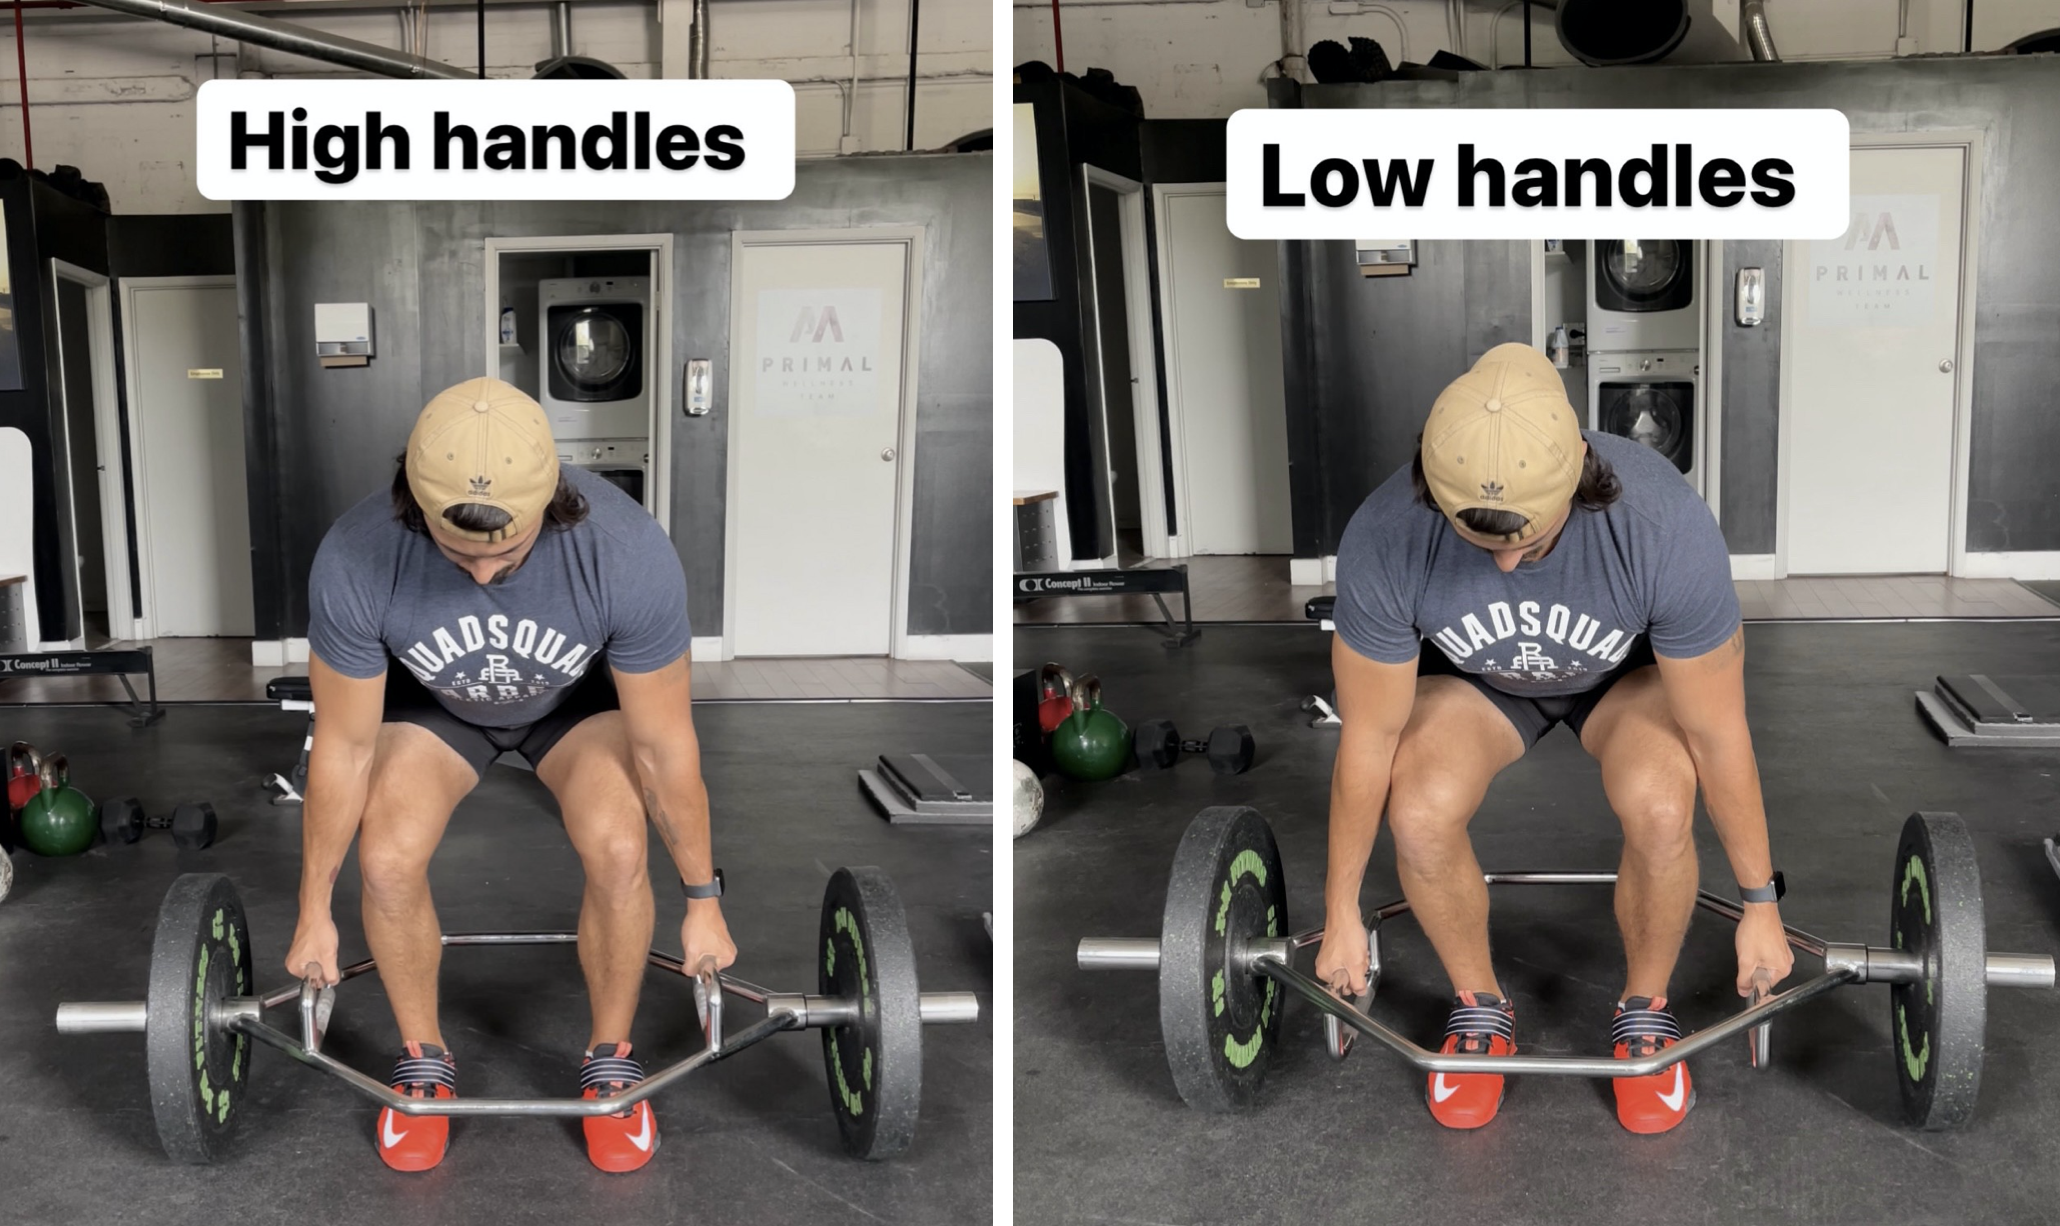
Trap bar deadlifts also have a built in range of motion acommodater. It usually has high handles, but you can flip the bar around and use low handles. For those with long arms or great ROM, the low handles can be useful. For those with short arms or less ROM, the high handles can be very useful as well.
This can be beneficial with beginners and in my experience as a coach, teaching the trap bar deadlift is one of the easiest ways to introduce someone to the deadlift. So if you have one at your disposal, I’d recommend playing with it.
Biomechanically, the trap bar has more potential of variance than sumo and conventional. This is mainly because you are inside of the piece of equipment. This matters because with a sumo or conventional deadlift, the bar is in front of you. Due to this, you have to keep pulling the bar close to you so that it stays in line with your centre of gravity. Standing inside the contraption of the trap bar basically accounts for this by nature. So you can go more hip dominant or knee dominant without having to maneuver the bar more or less around your limbs to keep it close to your body.
So you can set up which ever way is more comfortable or which way suits your goals more. For example, if you were trying to increase vertical power (say, your vertical jump), a more knee dominant position would make more sense. Since you’re going to use more of a mix of hip extension and knee extension to jump vertically. As to jump horizontally (like a broad jump), you would need more hip extension power to help propel your body forward. Also, if you’re working on more quad development, a heel elevated knee dominant position would be best. If working more glutes, a standard hip dominant position would be best. And if wanting to work more hamstrings, a stiff leg trap bar position would be best.

For execution, I’m going to cover a regular trap bar deadlift and a heel elevated trap bar deadlift.
Standard Trap Bar Deadlift
For the standard trap bar deadlift, your set up will be pretty similar to the conventional deadlift, minus the fact you may not need to go as low and you’ll be grabbing the bar to your sides and not in front of you. The standard trap bar deadlift may not be quad dominant per se, but it is less hip dominant than the conventional barbel deadlift. It is more like the hybrid stance conventional deadlift, minus the scraping your shins of course.
1. Foot Placement
Foot placement will be anywhere from hip to shoulder width apart again. Except, you may not have as much room to go shoulder width since you need to grab the handles to your sides. I suggest more of a hip width stance here anyways. Then, keep that tripod stable as always.
2. Set Up
As with the other deadlifts, you will start by sitting the hips back and bending the knee to whatever degree you need to then grab the bar. The high handles will have you not needing as much range here as well. Then while keeping your arms locked out, grab the handles and get ready to work.
3. Execution
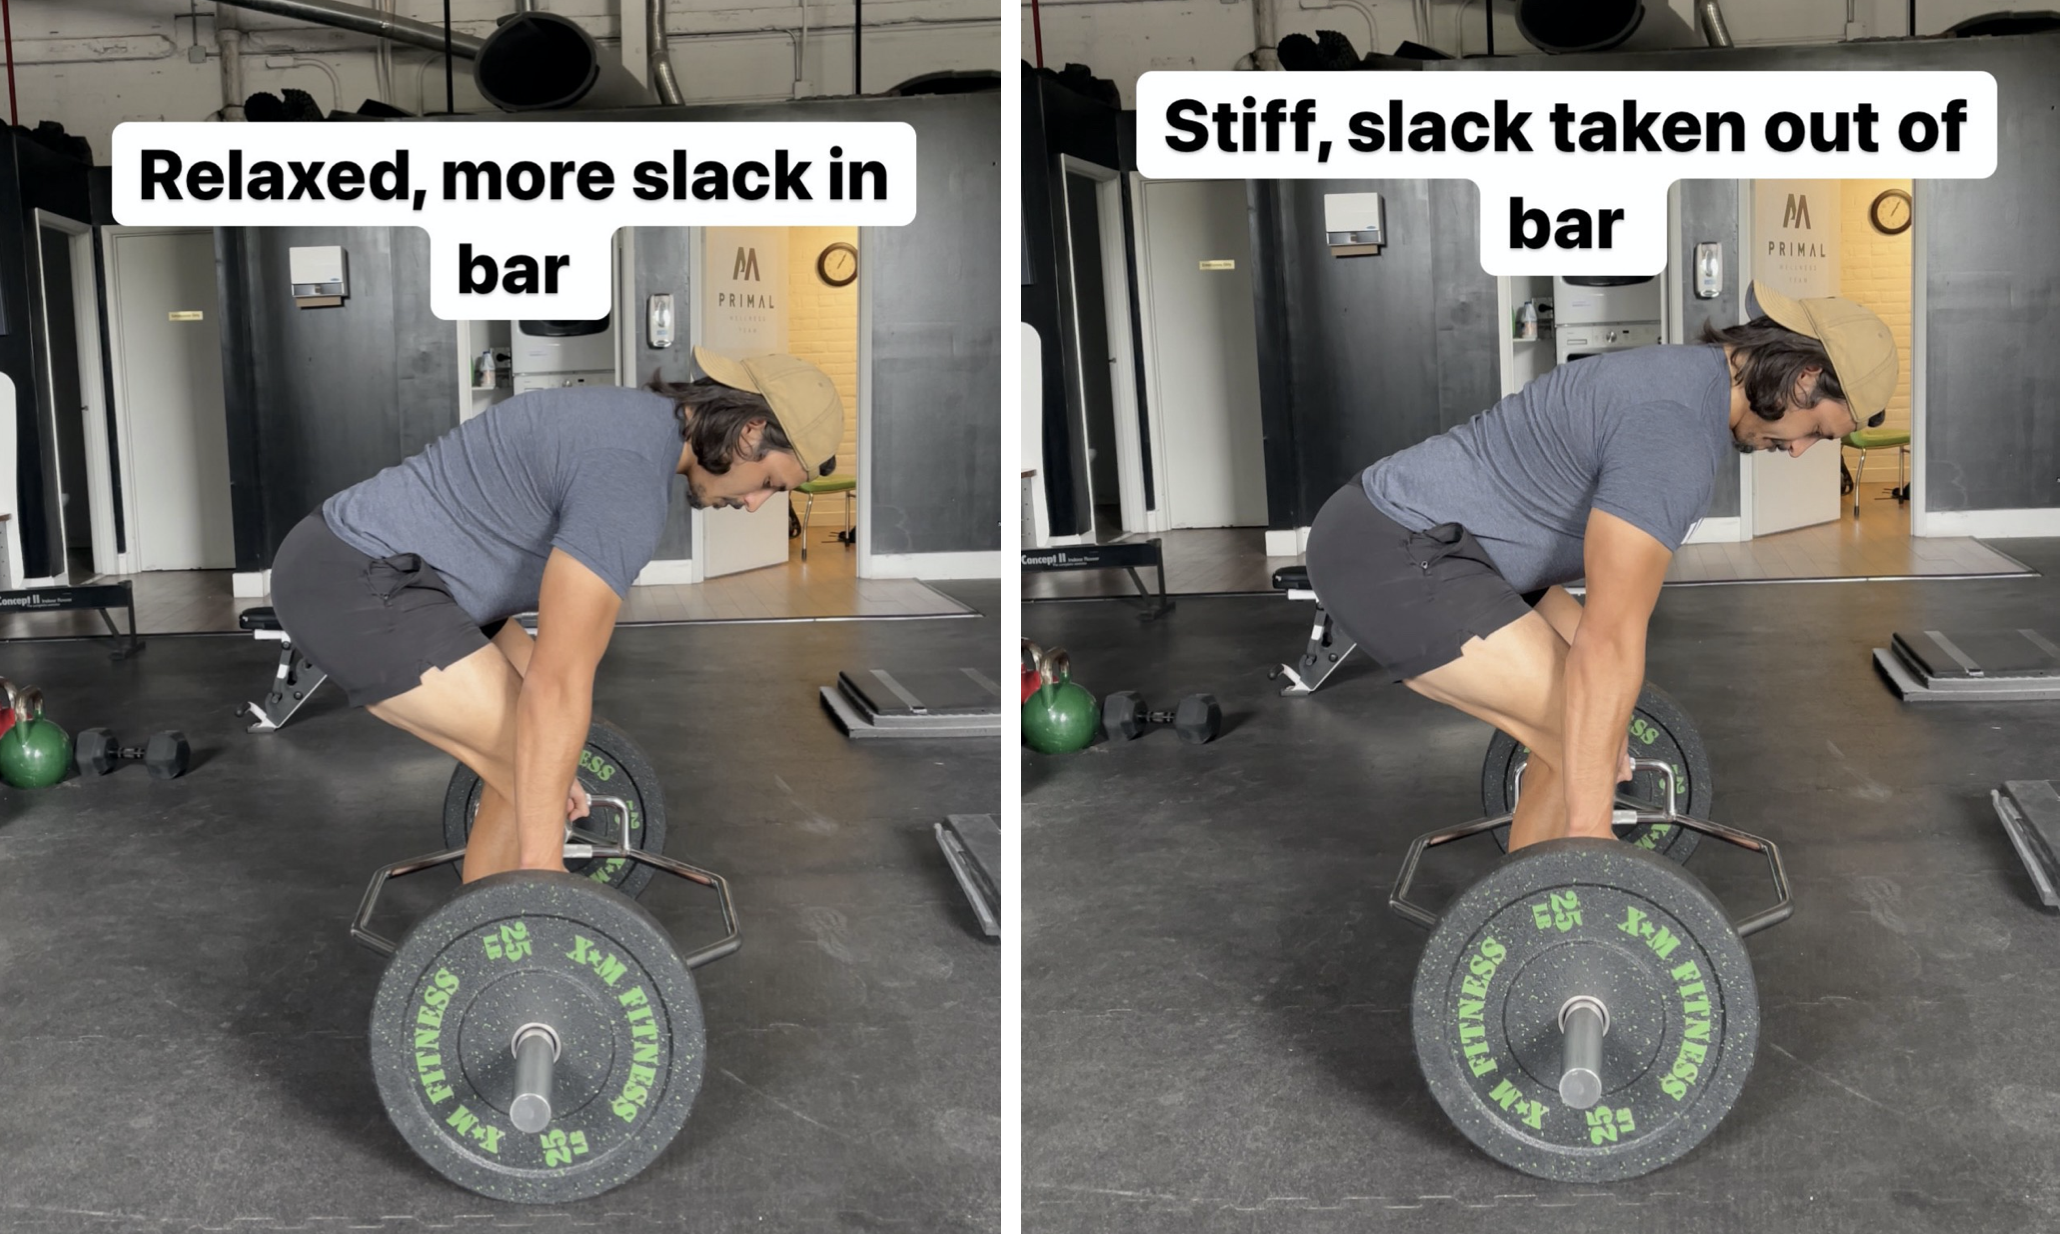
Taking the slack out of the bar will feel a bit different here. With conventional and sumo deadlift, an easy way to get feedback of tension is to pull the bar toward your body. You can’t really get that same feedback with the trap bar deadlift though. You don’t want to pull the bar back too much either, since the bar can’t just be stopped by your shins. So I like to imagine more so using the bar as leverage to pull my hips down a bit and take all the slack out.
From there, drive your feet into the floor as usual and stand up with convinction. Lock your hips out by imagining you’re trying to squeeze a credit card between your butt cheeks and you’ve completed the deadlift.
Heel Elevated Trap Bar Deadlift (Quad Biased)
The heel elevated trap bar deadlift is a new exercise that I’ve been a fan of. I learned it from Coach Kas who runs N1 education and training.
The heel elevated trap bar deadlift can be a great way to train your quads in the dead stop position, which is pretty hard to do. As mentioned in the beginning of this article, the deadlift (unlike the squat) has to overcome a static inertia without the benefit of the stretch shortening cycle. So we can add more quads into that mix too with this variation. Also, it’s just another great exercise to add to the tool box with training lower body and sometimes, that’s just valid enough to warrant adding them in.
1. Set Up
The set up will be different here. The foot placement will be similar to the standard trap bar deadlift except, you will first want to elevate your heels. You will see me doing this on some fancy steel wedges that I have, but you can also just elevate your heels on some small plates like 10 pounders.
The heel elevation will allow for more knee flexion on the way down. Since the quads are knee extensors, this will help them lengthen more and be more biased during the lift since the knee joint will be farther form the line of force.

From there, you actually want to initiate the movement by bending your knees and then sit into a position where you can grab the bar. Remember, you’re not only bending the knees, the hips will flex too. We just want to initiate the movement by bending the knees as to bias the quads more.
Then to grab the bar, do the same as with the standard trap bar deadlift. Keep your arms locked out and grab the handles in the middle of them which is basically where the sleeve (thick circular part where the weights go) of the barbell starts.
2. Execution
Once you are set up, take the slack out of the bar by getting stiff and pulling your hips a bit down, then drive your feet through the floor as usual. The big difference here is that your quads will be working a lot more though. A common fault that can happen is one similar a common one with squatting: shooting your hips.

This is where your hips shoot back to place more load on the hips. If you’re not used to biasing the quads here, you may see this. To correct for this, simply imagining driving your knees forward on the way up can be very useful. You will feel it more in quads too, which can be useful feedback.

From there, just stand up with authority as per usual. Making sure the hips and knees are locked out at the top. To come back down, once again initiate with the knees to make sure you’re biasing those quads again. Repeat for however many reps are in your set.
Summary & Final Notes
To end this novel-like article, I’ll leave you with some brief takeaways.
Deadlifting is a relatively safe exercise that you can use to develop several of your lower body and even trunk muscles. There are some considerations though, such as:
-Your training history and status. If you’re completely detrained or untrained, start slow and develop your skill and competence with the movements.
-Your goals. You don’t have to deadlift. If it makes sense based on your goals, than you should. But you definitely don’t have to. This also applies to which deadlift makes the most sense for you. One style may be more conducive to your specific goals and then you’d be best to priortize that specific deadlift.
-Your own biomechanics and mobility. If you don’t have sufficient range of motion to get into certain positions of the deadlift, that’s totally okay. Work within the ranges you can and progress from there.
-Your skill level. This touches on training history, but I thought it was still important to talk about. If you are brand new to this movement, be patient. You will make mistakes and you won’t have flawless technique. Keep practicing and you’ll continue to get better!
So I hope this was helpful to you and may have answered any questions you may have about the deadlift and some the deadlift variations out there.
Have some fun and keep training your ass off. 🍻
-Coach Dylan
References
How to Deadlift: The Definitive Guide
https://www.strongerbyscience.com/how-to-deadlift/
2. A Biomechanical Analysis of the Effects of Bouncing the Barbell in the Conventional Deadlift
https://pubmed.ncbi.nlm.nih.gov/29489730/
3. Injuries among weightlifters and powerlifters: a systematic review
https://pubmed.ncbi.nlm.nih.gov/27707741/
4. Prospective Epidemiological Study of Basketball Injuries During One Competitive Season: Ankle Sprains and Overuse Knee Injuries
https://www.ncbi.nlm.nih.gov/pmc/articles/PMC3786241/
5. Effects of squat training with different depths on lower limb muscle volumes
https://pubmed.ncbi.nlm.nih.gov/31230110/
6. Hip and Knee Kinetics During a Back Squat and Deadlift
https://pubmed.ncbi.nlm.nih.gov/30335723/
7. Kinesiology of the Hip: A Focus on Muscular Actions
https://www.jospt.org/doi/10.2519/jospt.2010.3025
8. An electromyographic analysis of sumo and conventional style deadlifts
https://journals.lww.com/acsm-msse/Fulltext/2002/04000/An_electromyographic_analysis_of_sumo_and.19.aspx
9. A three-dimensional biomechanical analysis of sumo and conventional style deadlifts
https://journals.lww.com/acsm-msse/Fulltext/2000/07000/A_three_dimensional_biomechanical_analysis_of_sumo.13.aspx