

The Beginner’s Guide to The Bench Press
Your Guide To Benching Effectively & Confidently
Oh, the bench press. The measuring stick of every bro at the gym. I would be lying, if I didn’t admit I have also participated in the age old game of “how much ya bench bro?” during my lifting career.
Let’s be honest, benching is f*cking awesome. It’s the most emphasized lift in the gym that doesn’t directly train legs. Making it a staple amongst us meatheads.
It’s also one of the three lifts in the sport of powerlifting. Which consists of the squat, the deadlift and the good old bench press.
This article is going to be geared more towards our beginner and novice folks who want to learn more about the bench press and how they can develop their technique with this popular lift.
If you’re on the more advanced side of things or just want a much more thorough guide, I highly suggest The Definite Bench Press Guide by Greg Nuckols.
I am going to be breaking down the basic components of the bench press, which muscles are going to be trained, strategies to improve your bench press and accessory work to help bring up your potential weak links.
There will be video demos of certain movements and plenty of pictures too. Let’s get to it!
What Is The Bench Press?
The bench press is a pretty simple movement at face value. While lying on your back, you bring a barbell down to your chest and then press it up. Demonstrating that no sweat was needed in the naming of this lift.
Even though this is a major chest or pec movement, there is a lot more at play during a bench press.
You’re going to want to use all of your leverages to maximize your bench press. As you’ll see, even the legs play a key role in your bench press. Just not enough of one to actually grow your legs with (sorry to my fellow meatheads, I know this stings to hear).
Is The Bench Press Necessary?
Honestly, no. It’s not a necessary movement. Unless you compete in powerlifting, of course. This also doesn’t mean you shouldn’t do it.
While, the barbell bench press may not be the absolute best exercise for growing your chest, it’s still a very solid one. What I think is crucial about the bench press, is that people tend to really enjoy it and want to get stronger at it. Which should not be overlooked.
Say you found an exercise that stimulated your pecs a little more, but you didn’t care about that lift as much. Which exercise would be better? The answer would be up to you and your goals.
If your goal is getting as jacked as humanly possible and you take a full on utilitarian approach, then I’d lean toward the exercise that hits the most chest. But, if you’re just a recreational lifter and training in a way that you enjoy matters a lot, then I’d go for the bench press (assuming you enjoy it).
Technically, the bench press is only a must do exercise for competing powerlifters, but it’s still an exercise plenty of us enjoy and just want to get good at. This includes myself.
Main Muscles of The Bench Press
As I’ve already mentioned, the bench press is often considered a chest exercise. Which it largely is, but there are several other muscles that are key in this lift.
Let’s break it down.
Prime Movers (agonists)
The prime movers are the muscles that are directly working on the loaded joints to move the external load. The external load is the barbell in this context.
Muscles have an origin and an insertion. This means they originate somewhere on the body (origin is the closest part to midline of the body) and they attach somewhere else (the insertion).
Muscle’s are pretty simple in action as they essentially just pull on the insertion to bring it closer to the origin in most cases (they can also pull the origin closer to the insertion).
The prime movers in the bench press are the muscles that contribute in a meaningful manner to move the weight on the way up in the press.
The Pectoralis Major (big chest muscle)

The pec major is the biggest prime mover in the bench press. It is what is called a convergent muscle. This means it originates at several different areas that all converge to insert in the same area.
It originates along the clavicle (collar bone), down the sternum and even along some of the true ribs (1–6). This is why you have probably seen so many different types of variations of chest exercises to hit different pec fibres.
An incline press will hit more of those upper, clavicular fibres. A flat press will hit more of the middle, sternal fibres and something like a dip will hit more of those lower, costal (ribs) fibres.
All of these fibres converge to insert into the upper arm (the greater tubercle of the humerus).
On the way down in the bench press, your upper arm will travel away from your torso in what is called horizontal abduction (this is easy to remember since it’s like your arm is being abducted from your body) and the main action of the Pec Major is horizontal adduction of the upper arm (also easy to remember since it’s like adding your arm toward your body).

So as you take on the load by lowering the weight and abducting the arm, your pecs will be heavily relied on to horizontally adduct your arm to bring the weight back up.
The Anterior Deltoid (front fibres of your shoulder muscle)

Secondly, we have the anterior deltoids helping out.
The deltoid is your shoulder muscle. Now, the reason I’m specifying this is the anterior delts is because the deltoid is a large muscle with fibres that run in three different directions.
The anterior (or front) delts help with shoulder flexion. Which is the act of lifting your upper arm up in front of you. While the lateral fibres work more to abduct (pull your arm away from you) and the posterior fibres work more to extend the arm (pull your upper arm behind you).
Because of these three different actions, only the anterior fibres will help in your bench press.
Since as you lift the weight up off your chest, your upper arm is abducted but also extended. The pec major helps with the adduction of the arm, while the front deltoids help to flex the upper arm to lift the weight.

This makes the anterior delts one of the prime movers of the bench press.

Lastly, we have the triceps muscles. Which given away by it’s name, has three separate heads.
All three of them contribute to elbow extension (locking out your elbow), which will be needed for the lockout of the bench press and to aid in the press up. Hand placement can also lead to more or less contribution of the triceps in the bench too, but we’ll get to that.
One other note is that the long head of tricep also contributes to shoulder extension, so it may not be as helpful as the other heads in the bench press, since there is shoulder flexion in the press. I say this to emphasize that if you want great triceps development, you won’t want to rely solely on the bench press for that.
Stabilizers
Next we’re going to talk about key stabilizing muscles in the bench press. Stabilizers are muscles that help keep you stable and in a position to train the movement.
Imagine you’re squatting and your spine fully folded into flexion. You wouldn’t be able to complete the lift. The muscles that stabilize your spine allow you to squat. These muscles won’t grow significantly during these movements, but they are still important.
The Spinal Erectors
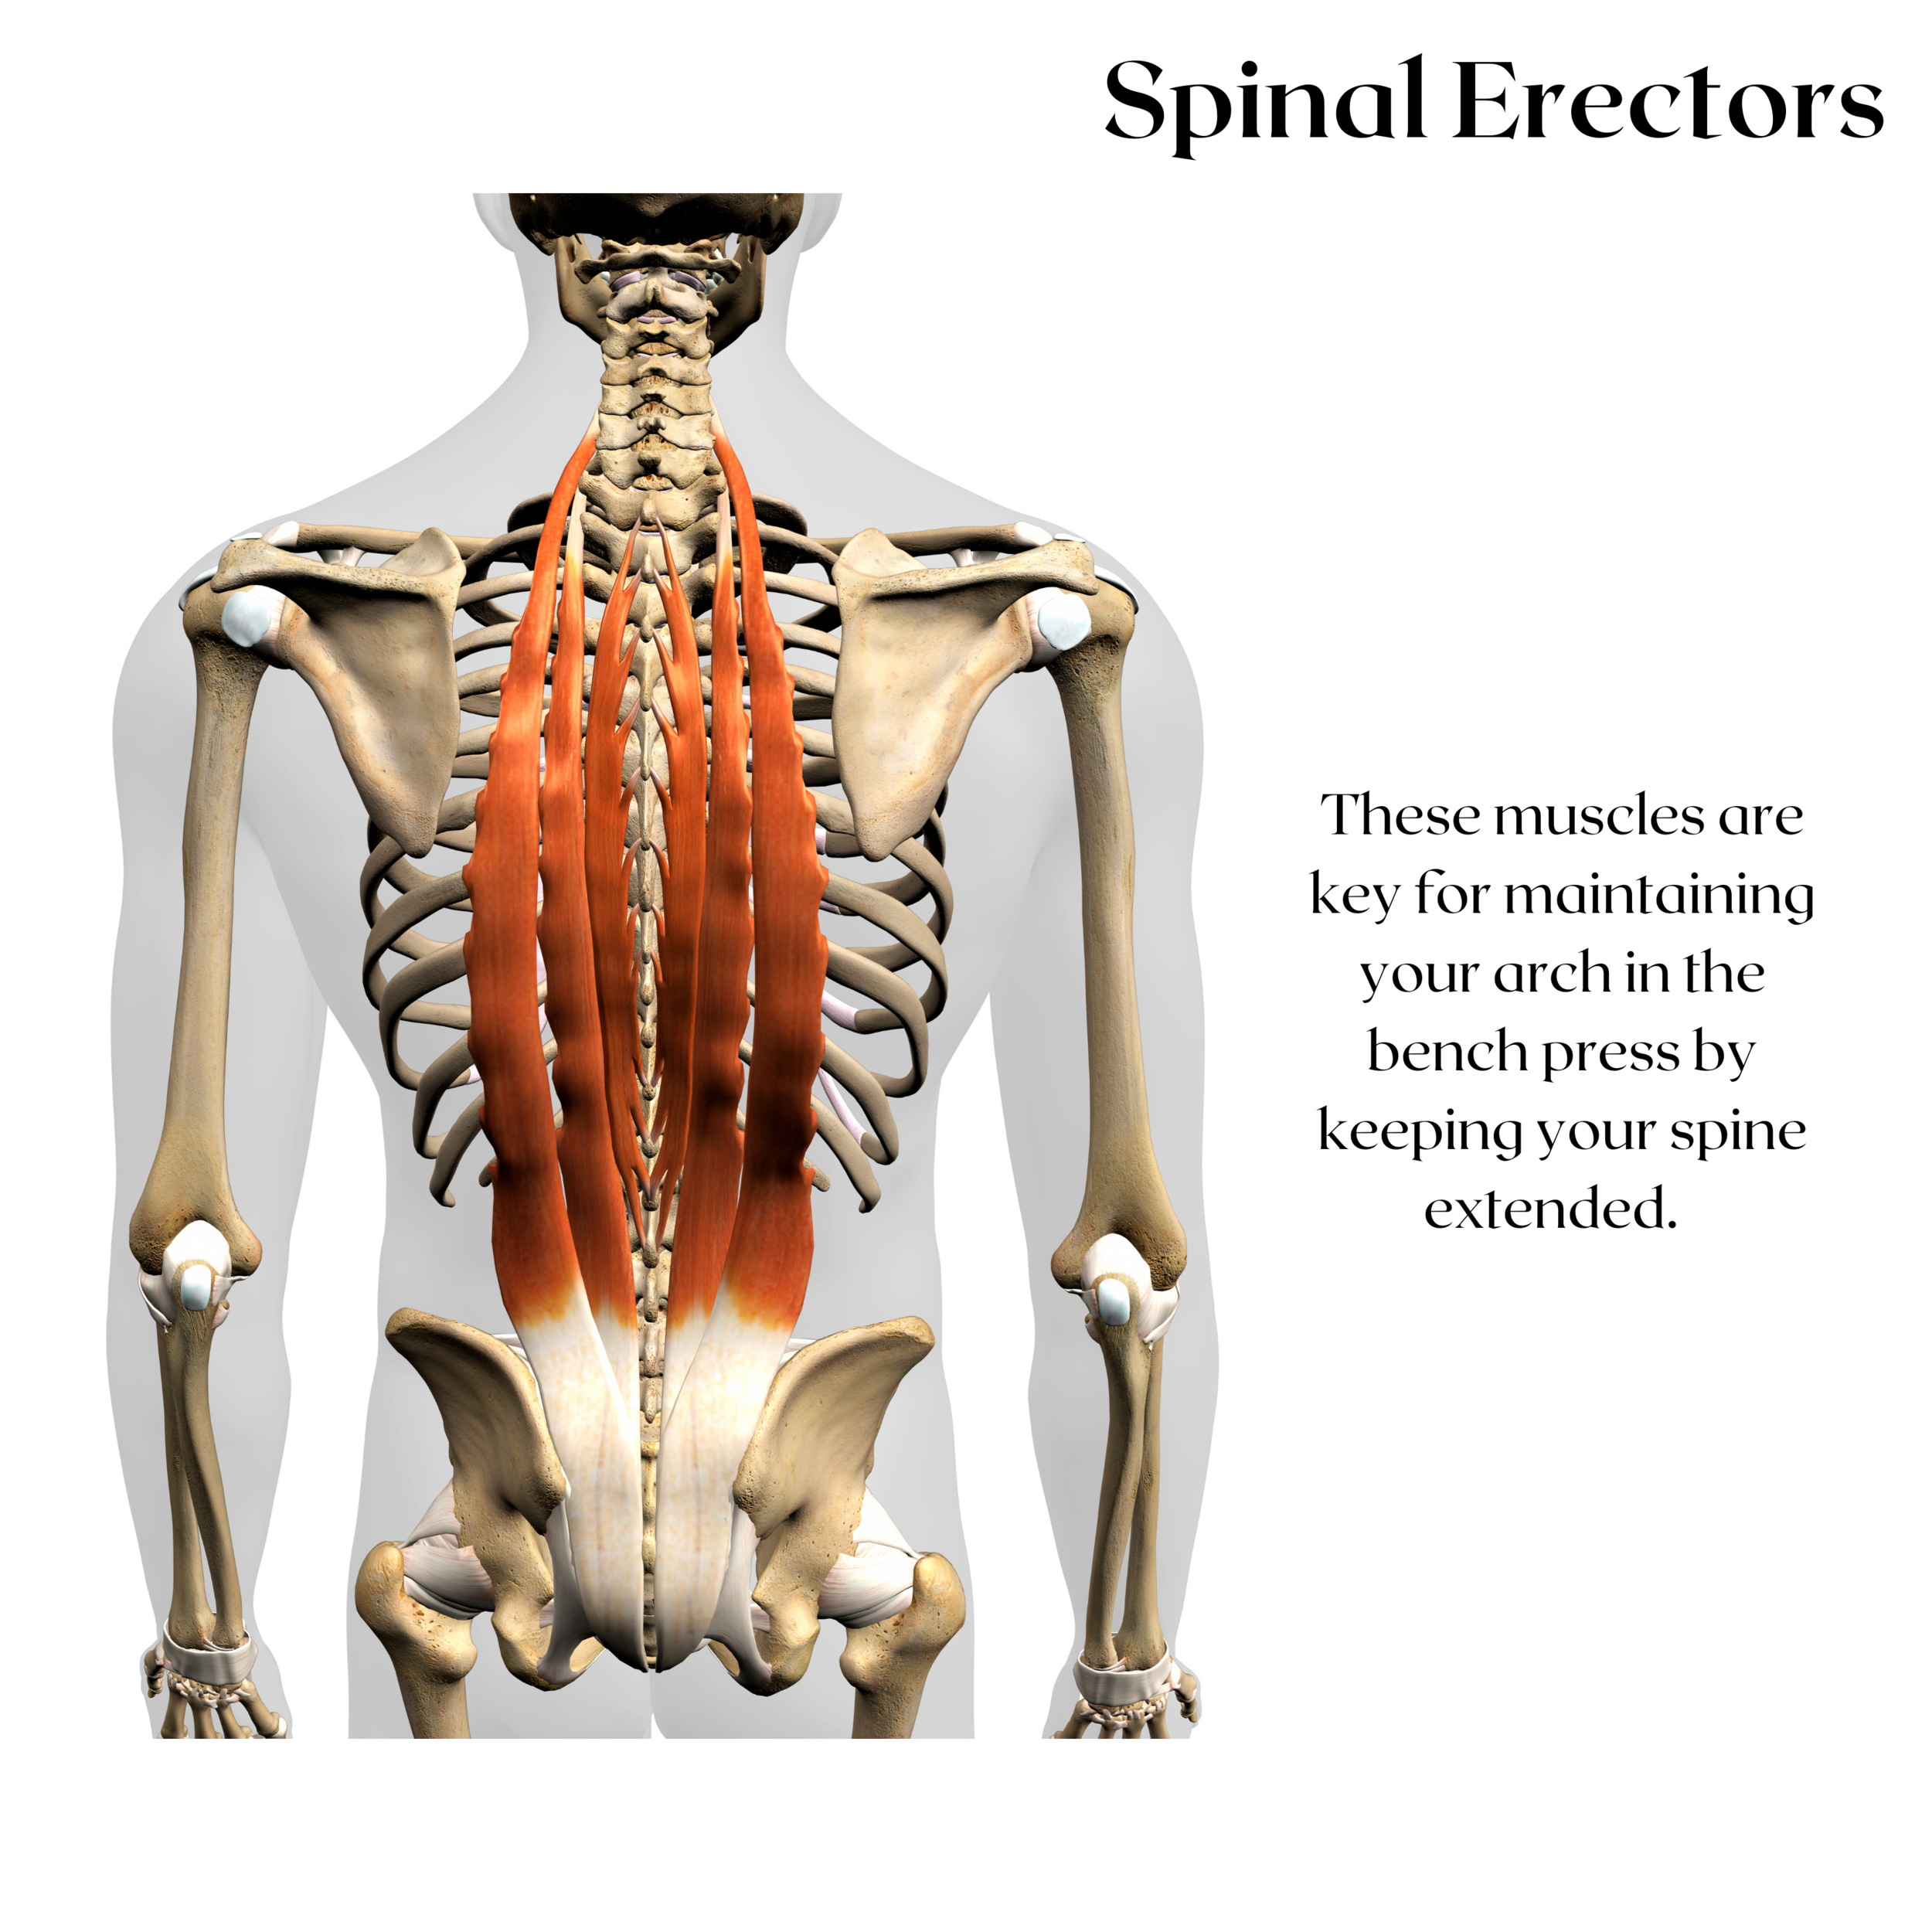
This is a large group of several muscles.
The role they will play in the bench will be to keep you spine extended and maintain your arch.
If you lost the arch while benching, it could be a big problem.
The Rotator Cuff Muscles

Your rotator cuff muscles are made up for four different muscles.
They all either internally or externally rotate the arm.
Their role in the bench is that they help keep the head of the upper arm in the cavity of the glenoid.
The Upper Back Muscles

Your upper back will mainly be comprised of the rhomboids and mid/lower traps.
As you’ll see, a main cue is to maintain scapular stability while doing the bench press.
Shoulders back and down is a common one. These muscles will aid in maintaining this position during your bench press.

These are the last stabilizing muscles I’ll talk about.
The role of the lats in the bench press is some what of an antagonist/stabilizer. Since on the way down, your arm will be going into flexion, your lats being a shoulder extensor have to allow for that to happen.
Similar to how the biceps have to allow for the triceps to lengthen by shortening themselves. So the lats do contribute to the bench press, but not in a concentric way. Only the prime movers we discussed will do that.
I am also going to touch on leg drive later, since it is important, but I don’t think I need to go into lower body anatomy for that. Just know that the lower body will also contribute somewhat to the bench press via leg drive which we will discuss!
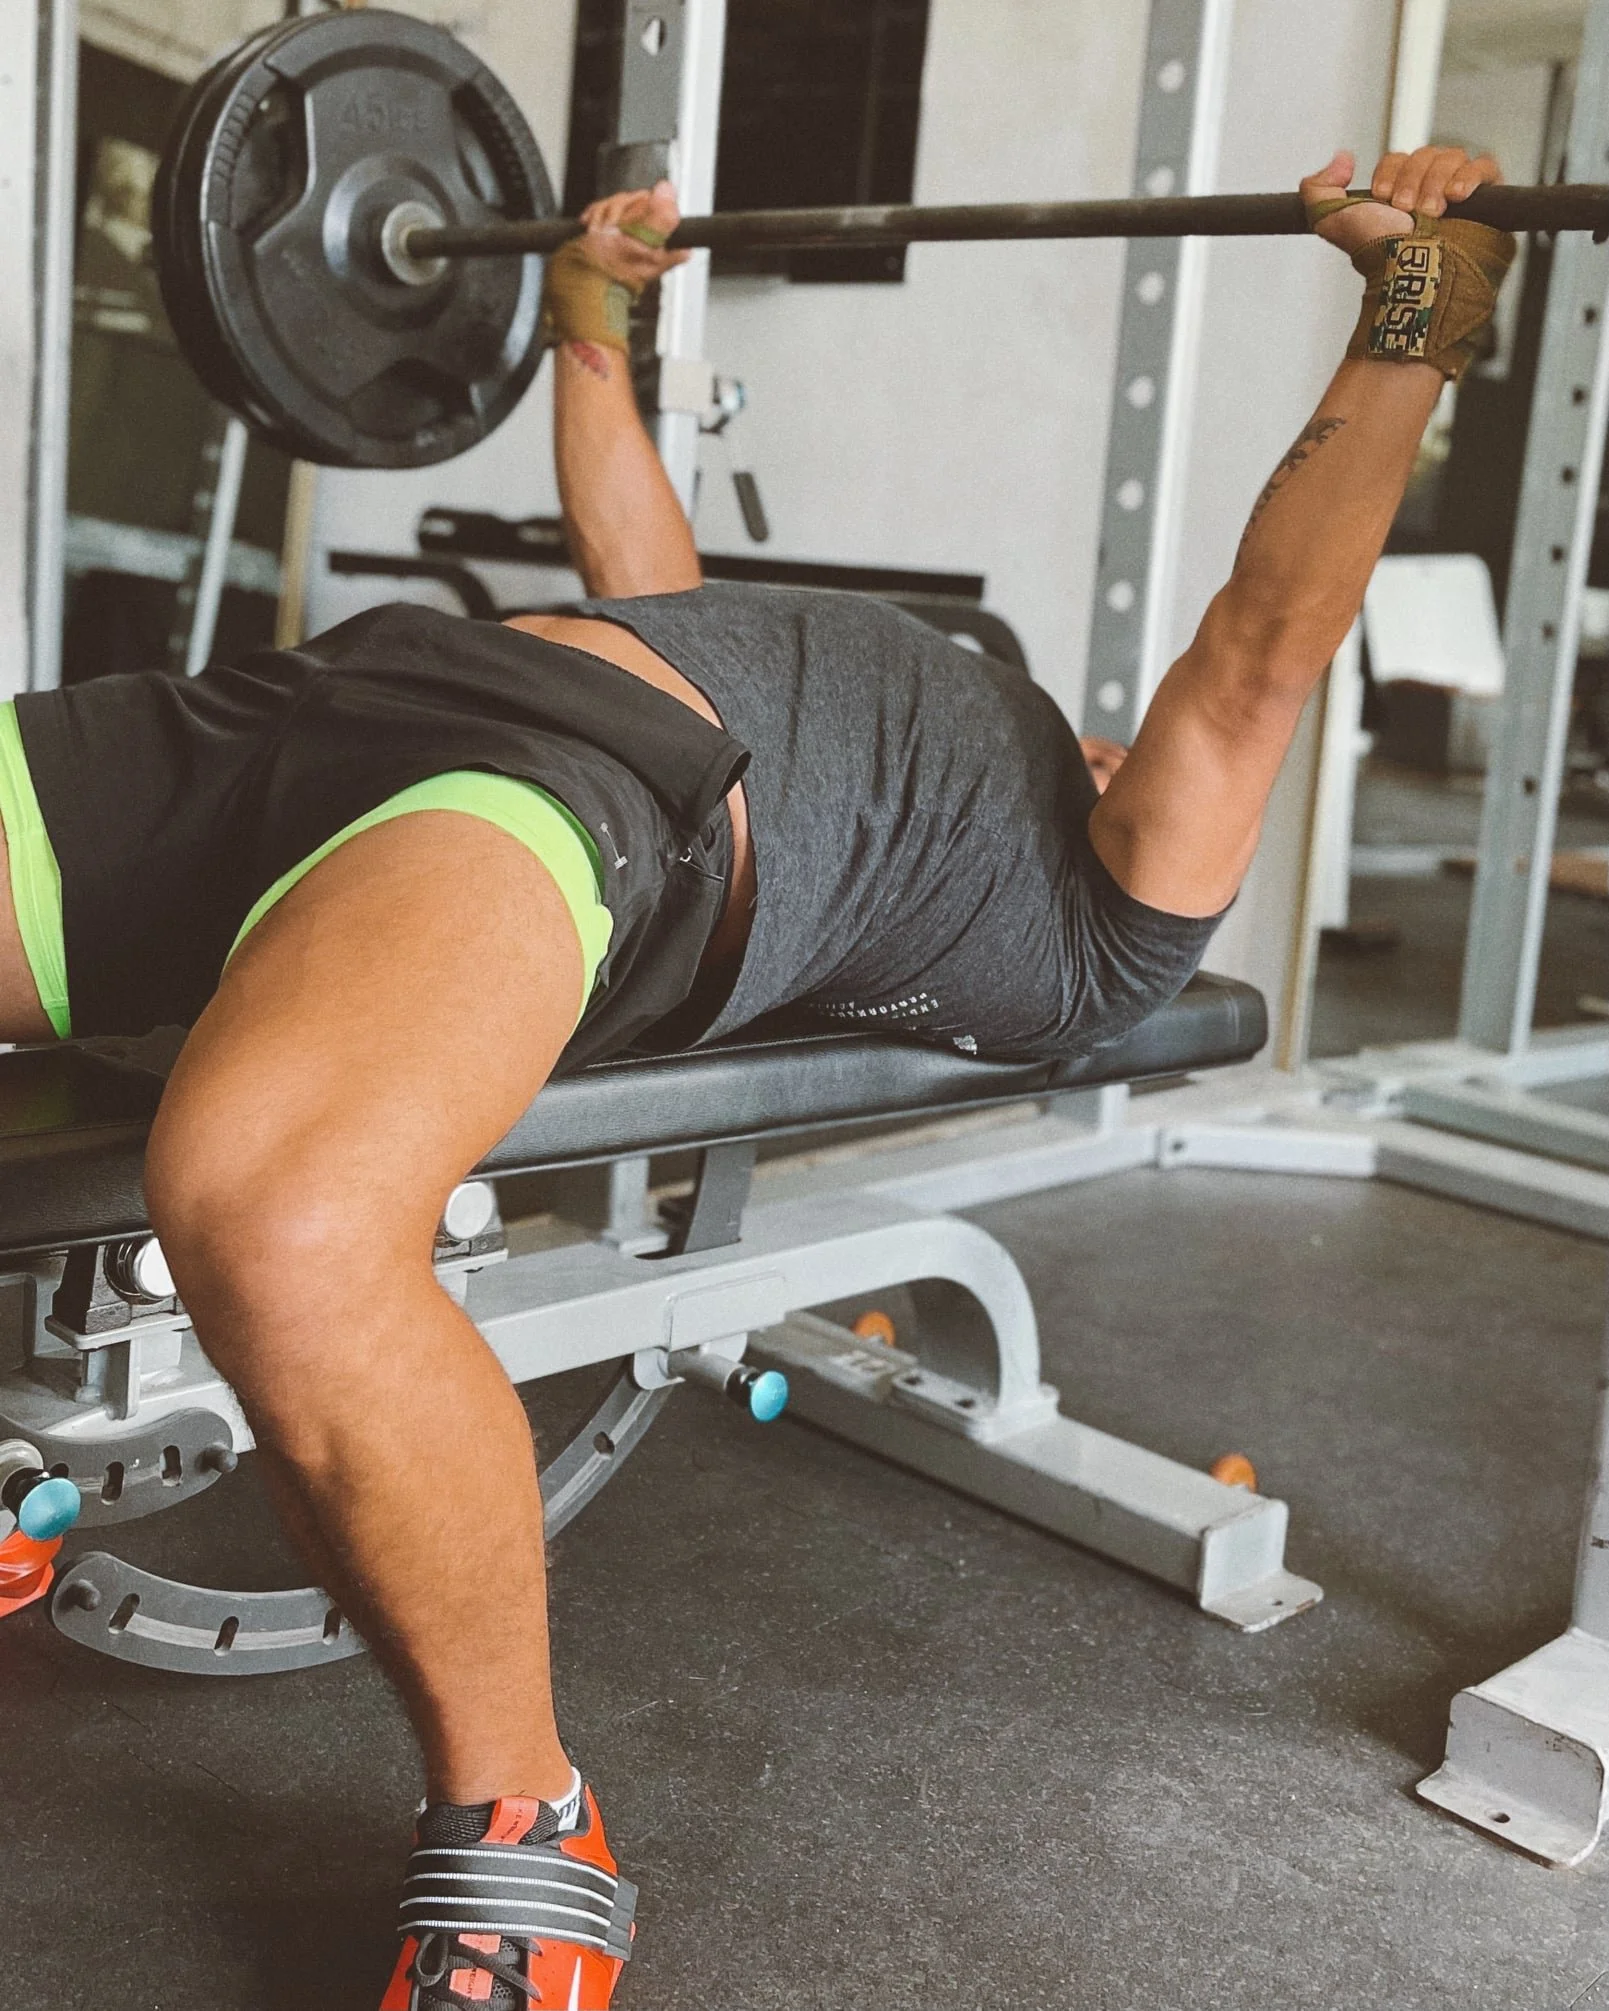
How to Bench Press
Now that we have a decent understanding of which muscles are involved in the bench press and how, let’s move on to the actual lift itself.
Step 1: Set Up
Your set up with the bench press is quite important. I like to find a set up that helps you move the most weight, but is also manageably comfortable. I say manageably because if you’re not used to some of this stuff, these changes may be uncomfortable initially.
First, let’s talk about using an arch. Now, you don’t have to use an arch. If you’re trying to get more muscle growth out of your bench press, you probably don’t want an excessive arch either. With that being said, utilizing some form of an arch is something I recommend.
If you bench with a complete flat back, you may actually be not getting as much loading on your chest especially that you could be looking for. One reason is that an arch will also stick your chest out which can help with getting that stretch on your chest on the way down. An excessive arch will also take away a lot of range of motion, so there is a sweet spot to the arch.
If you care more about your absolute bench, then a larger arch is often a good idea since it will shorten the range of motion.
Foot placement
You’ll want to start off by setting your feet. Generally speaking, you’ll get the best leg drive if your whole foot is on the floor.
Start by walking your feet back. Once you hit your end position, drive your hips up to make sure your feet are in a position that you can still powerfully through the floor with.

Then bring your hips down so they are just grazing the bench. They shouldn’t be relaxed into the bench. Keep the tension.
Arching/Setting The Scapula
Once your lower body is set, you’ll want to set your shoulder blades and get your arch.
You can do this by using the bar as leverage, but it’s often more helpful to use the rack itself.
While keeping your lower body set, drive your hands into the rack to drive your shoulder blades toward your hips.

If you do this, you’ll often notice that you get a better arch than normal. If you don’t want a really big arch, you can easily just skip this! Alternatively, you can use the bar as leverage for this set up too.
Once you have your lower body and arch set, make sure your shoulder blades (scapula) are retracted (pulled together like they were trying to pinch something)
This will aid in shortening the range of motion by helping bring your chest up higher to meet the bar. Also, this can help protect the shoulder. If you take a bench press through a long range of motion without retracting your shoulder blades, it can get you into some less than ideal positions for your shoulder. One reason for this is because a retracted shoulder blade will reduce the amount of shoulder extension you can get while also shortening the range of motion by helping your chest get higher. These are two mechanisms that can limit excessive shoulder extension on the way down.
One last thing on scapula retraction:
This is not a very natural position to be in. It’s a technique used in maximizing your bench press specifically. I actually don’t recommend keeping your scapulas pinned back for any other upper upper body movements. Even with a flat dumbbell press your shoulder blades will move through more retraction and protraction. Push ups are a great example of this too. So for the bench press, it is a good technique, but this technique does not extend out to your other upper body movements. Your scapulae does need to be able to move!
Finally, if you’re aiming to get the most chest hypertrophy out of your pressing, this won’t exactly be the best exercise or execution for that specific goal.
While you will get chest gains from this, this strategy is more so to help you improve your strength on the bench press. As mentioned before, if you’re aiming for max chest gains, a flat dumbbell press is often a better option in my opinion.
Hand Placement
Now your body is set. Making it time to grab the bar. This leads us to hand placement.
This can get a bit confusing, so I’ll try to simplify.
Generally speaking, close grip bench will hit less chest and more triceps and anterior delts. While a wide grip is generally going to be more chest and less triceps.
With that being said, the difference may not be as big as we think. This is due to the fact there are not only vertical forces at play with the bench press. There are also horizontal forces.
Simply put, you’re not only driving force vertically into the bar.
To simplify this, I’ll have you imagine two different scenarios:
Imagine close grip benching with a bar that had melted butter on it
Imagine wide grip benching with that same bar.
In the first scenario, you can imagine your hands would slight toward eachother. That’s because you’re not only driving force up, you’re also driving force in. While in the second scenario, you can imagine that your hands would slight away from eachother. Since you’re not only driving force up, but also out.

Since the bar is dry and hopefully your hands are chalked up, friction will help them not move. Yet, that still doesn’t mean Newton’s third law goes away.
A law that states “for every action, there is an equal and opposite reaction.” So when you drive your hands in on a close grip bench and more out on a wide grip bench, you will change the line of force slightly so that it’s not only vertical.


Above is an example of a more wide grip. If it was a close grip, the opposite would happen. This was something I actually didn’t understand until I saw this paper covered in the MASS research review.
This may seem a bit too much for a beginner’s guide, but I do think it’s something that you may want to be aware about if you’re new to benching or trying to get more out of and understand the bench to a greater degree!
If you read my Beginner’s Guide to The Deadlift, this is similar to the sumo deadlift. In how you’re not just driving force vertically into the floor. Rather, you’re driving force down on an angle.
With that being said, here is my general suggestion for finding a good hand position for you.
If you’re trying to get a really strong press, you’ll want to be in the best position for when you hit the sticking point. Which is just simply the hardest part of the lift – hence why you’ll get stuck there.
This will often be when your upper arm is parallel to the floor. So an efficient hand position is one where when your upper arm is parallel to the floor, your forearm is completely perpendicular to it.
That way you can drive force straight up while you’re in the hardest position.
This won’t be a hard rule for everyone, but it’s one I’d start with and see how it works! If it doesn’t feel right or strong, play around with slightly farther or closer grip widths and see what works best for you.
Un-racking The Bar
Now your position is set and so is your hand placement. It’s time to lift the bar off the rack!
There is one major key to this, don’t lose your position. A spotter can be tremendously helpful here too.
I will also reiterate not to stress about this too much. This is a skill you’ll develop as you become a better bencher. So be kind to yourself as you probably won’t be amazing at all of this from the get go — I know I wasn’t and still have work to do.
The main thing here is that you get the bar off the rack without losing your arch, upper back stiffness and retracted scapulae.
If the bar is racked too high, this will be inevitable. Making it important that the bar is in a position where you don’t need to reach too high to grab and unrack.
This will take practice but just keep it in mind when learning to do this more efficiently.
The Descent
Now that your bar is un-racked and ready to go, it’s time to lower the weight. If you read my other guides, you may be aware of the bar path. In both the squat and deadlift, I typically suggest aiming for a pretty straight up and down bar path.
That isn’t what seems to be the best path for the bench press.
On the way down, the bar won’t usually travel straight down in a vertical line. Rather it will travel on an angle down toward your lower chest.

This is largely because of how the prime movers work in the best press. Specifically the anterior delts and the pecs. Since the anterior delts flex shoulder (vertically) and the pecs (the middle fibres especially) adduct the arm horizontally, so a perfectly straight bar path probably wouldn’t be ideal. One study even showed that as bench press loads got higher, lifters tended to gravitate toward this bath path, seemingly because it is more efficient than going straight down.
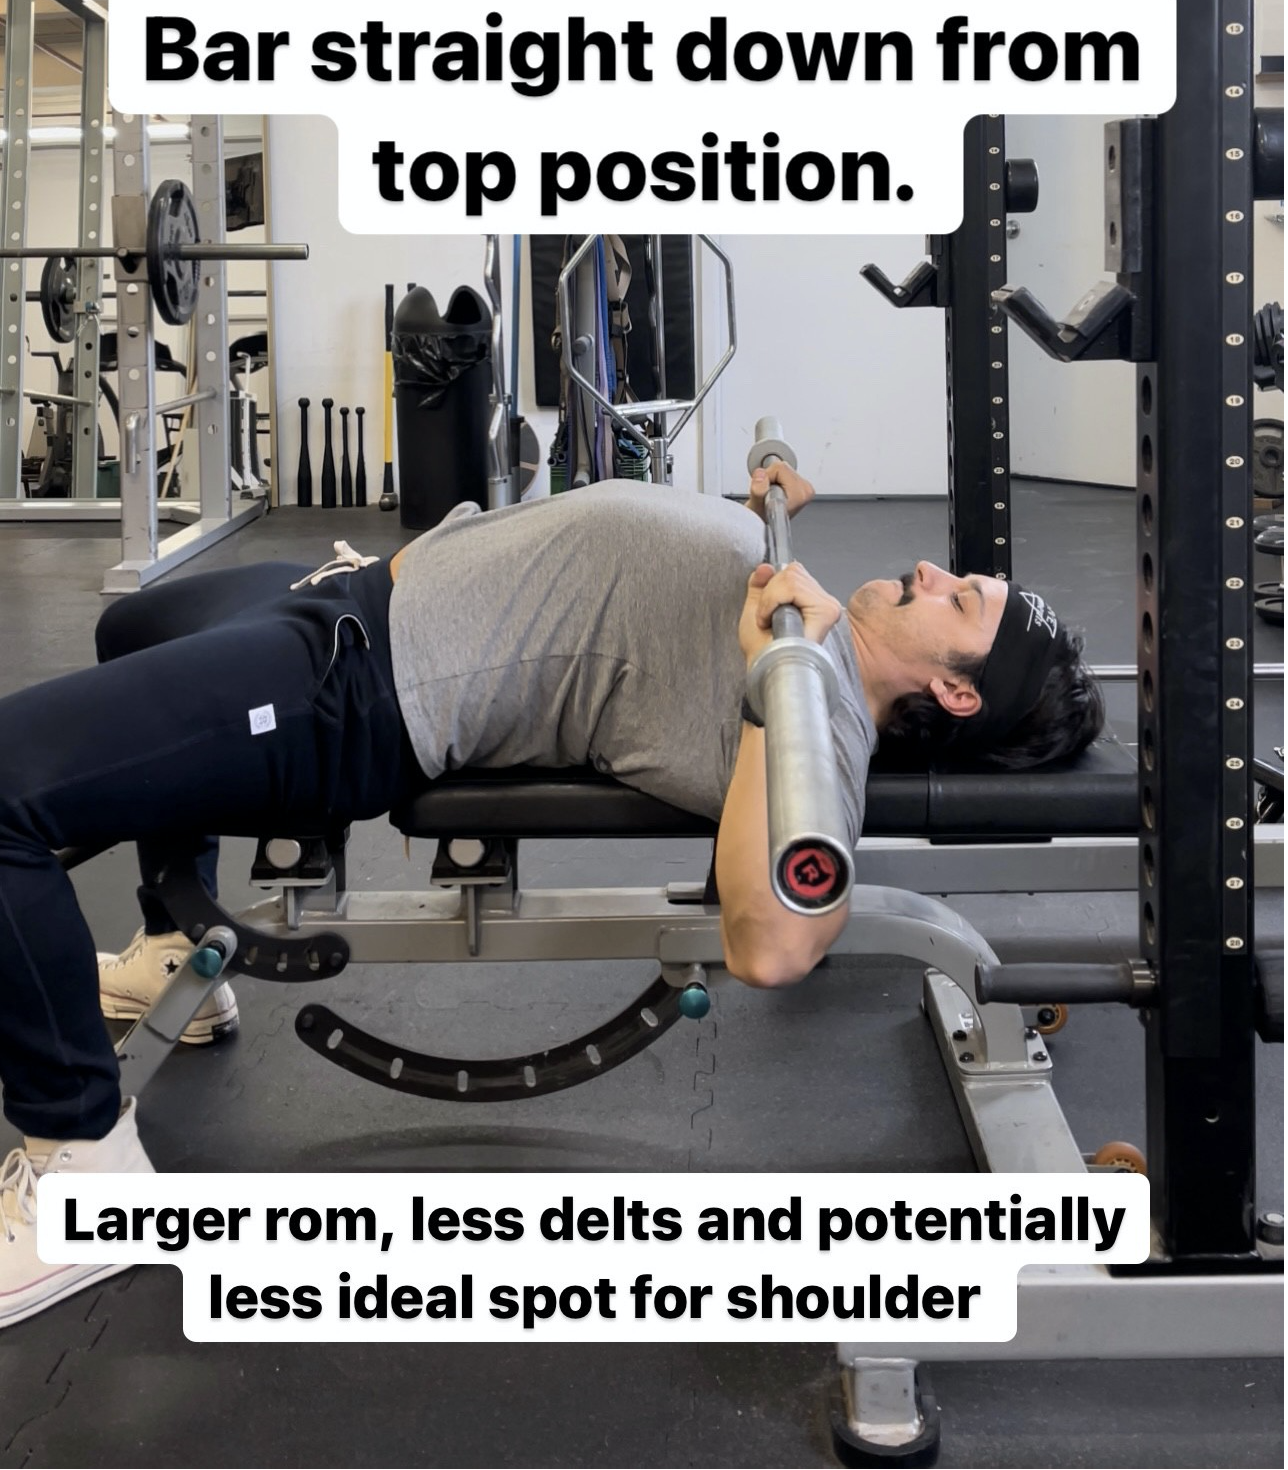
If the bar went straight down from the top position, it would put the shoulders in an unfavourable position that they also wouldn’t be as helpful in.
Not to mention, you’d be getting a hell of lot more range of motion as you’ll see here.
Conversely, If the bar went straight up from the recommended bottom position, it would reduce your pec’s ability to help out while also making the top position excessively hard on your shoulder.
As you’ll see, the ending position should have the load (the barbell) stacked on top of your wrist, elbow and shoulder. That way there is virtually no moment arm for any of those joints.

A moment arm is simply the perpendicular distance between a joint and a line of force. If the barbell is stacked vertically on a given joint and gravity is pulling it straight down (as it does), there is virtually no moment arm. Which is why you can seemingly hold that position for a long time, but you can’t as you lower the weight. In the picture above, the dotted line represents the moment arm at the shoulder. If the bar was stacked on top of the shoulder, there would essentially be no moment arm at the shoulder.
So we are going to aim for an angled descent path. Near or just below your nipple line.
First, let’s make sure you’re ready to lower the bar.
Here are the basic things to remember before and as you lower the bar.
Before you lower the bar:
Make sure your legs are driving into the floor, your scaps are pinned back you have your arch in place.
Grip the bar as hard as humanly possible. You don’t need to do this since the bar rests in your palm, but this is a missed opportunity for a lot of people. A tighter grip will typically allow you to drive more force into the bar, so I highly recommend you do this.

3. Have a slight break in the wrist. If your wrist is dead straight, the bar may actually sit more on the edge of your forearm. While if you wrist is too extended, the barbell and load will be placing a lot of force on your wrists/forearm muscles. So I recommend a very slight break so you can imagine the barbell is stacked along the middle of your forearm bone.
As you lower the bar:
Imagine either pulling the bar apart or bending the bar. This will help keep that upper back stiffness.
Bring the bar down to your lower chest, typically at or below the nipple line.
Keep your feet driving into the floor and actually imagine your chest coming up to meet the bar.
This will all have you in a great place to explode to push the bar up and complete the lift!
The Ascent
Once you’re at the bottom, it’s time to actually press the bar. Now, you can pause at the bottom or you can just touch and go. If you plan to compete in powerlifiting, you’ll want to pause since the sport demands it. If you’re just a recreational lifter like me, you can just touch and go.
Regardless, you don’t want to bounce. Just like how with the deadlift, I don’t recommend the bounce, I say it’s even worse with the bench. Since you know, you’re bouncing weight off your body in the latter and off the floor in the former.
The bar path with the ascent is actually going to be a little different than the descent. A cue I have grown to really love is one that I got from the lifting lyceum by Omar Isuf & Greg Nuckols which is “touch low, flare and push.”
If you only focus on touching low and pressing up, you’ll find yourself in that position above (with essentially constant tension on the delts). While if you focus on flaring your elbows the whole time, you’ll just end up with the bar high on your chest with less help from your delts.
As you’ll see below, the path on the way up comes up toward your face and then up. If the bar went straight up from the bottom, you delts would be under excessive load while your pecs wouldn’t help out as much. Since your pecs are the strongest muscle in this lift, this path will aim to have them doing the most work, especially at the hardest part.

If your elbows stay too tucked, your pecs won’t be as helpful to the lift since the pecs are arm adductors and tucking the elbows too much will adduct the arms.
Once you’re at the bottom, here are some general cues that can help!
Drive your feet as hard through the floor as you possibly can. With that being said, almost imagine that you’re pressing your feet into the floor on an angle that is away from you. If you were bench pressing on ice, your feet would slide away from you.
You can focus on either flaring your elbows and pushing from the bottom OR pressing the bar towards your face from the bottom and then up. Play with both and see which one works best for you.
Once again, make sure you’re gripping the bar as hard as humanly possible and then also try to move that bar as fast as posssible. If it’s heavy you won’t be able to move it very fast, but the goal is to try. In fact, there is some research showing how maximal intended velocity can result in better gains in the bench press specifically (but this probably goes for most of your lifts).
One more cue that can help with that is to imagine actually pushing your back into the bench as hard as you can. Kind of like you’re pushing your back into the bench as you’re pushing the bar away from you. This cue can also be helpful. The perfect cue is the one that resonates with you the most!
You want to use that force to get a full lock out and voila! You’ve completed a bench press repetition.
Here is what an entire set would look like for me from the set up to the execution.
How To Get Better At The Bench Press
I’m actually going to keep this very simple.
There are two things that I’m going to suggest for you to get better at bench pressing.
Practice, practice, practice!
It’s not uncommon for someone to be stuck with their bench press while also only benching once a week. If this is you, this is some low hanging fruit.
The bench press, just like any major lift, is a motor skill. And we learn motor skills better when we do them more frequently. If you’re only benching once a week, you’re leaving skill acquisition gains on the table.
With that being said, this doesn’t mean you need to max out three times per week. I just recommend doing some sort of bench press 2–3 times per week if you really want to get better at it.
This could look like one heavy day where you work up to a heavy single, double or triple.
One medium day where you something like 3–4 sets of 4–6 reps and then even one day where you’re doing higher rep in the 6–10 range or some sort of variation like a pause bench press, spotto press or even lighter sets where you’re practicing generating maximum speed off your chest.
Regardless, adding some frequency and variety can be very helpful!
It can also be helpful to follow a bench specific program. Jeff Nippard actually has a great one that I personally used and enoyed.
One caveat is that if you’re a true beginner, you probably don’t need to be doing heavy singles, doubles or triples yet. You’d be better off with sets of anywhere between 5–12 to get more reps in and potentially more muscle growth.
2. Get More Jacked.
This can honestly help you quite a bit. Now, a bigger muscle is not automatically a stronger muscle. It’s just that a bigger muscle has more strength potential.
Your muscles need to generate force in order to pull on your bones to move. Example, your pecs will pull your arm toward your body horizontally in the bench press. This will help lift the weight. The more force your muscle can produce, the stronger you’ll be.
There are plenty of neurological adaptations that help you get stronger too, regardless of the muscle growing, but all in all, getting more jacked will only help.
Make sure you do your accessories for the prime mover muscles, eat plenty of protein (generally speaking 0.7–1.2 grams per lb of body weight will be great), eat enough calories (not being in a big deficit is a good idea) and to make sure you’re sleeping enough to ensure you’re recovering effectively.
This is obviously an oversimplification for growing muscle, but honestly, unless you’re advanced, those tips will probably do wonders on their own.
For accessories, exercises like flat dumbbell presses, push-ups, incline dumbbell presses/ barbell presses can be great additions to get more pec hypertrophy.
Dumbbell overhead press, high incline presses & military presses can be useful to develop your anterior delts more.
And dumbbell/barbell skull crushers, triceps cable extensions, close grip bench and JM presses can also be great for helping grow your triceps too.
This is by no means an extensive list or THE list of accessories for the bench press. It’s just a simple one that can help you get started.
If you notice one of your body parts is holding you back, simply prioritizing that body part in your accessories can help quite a bit.
That’s all I’m going to talk about on that for now, since this is not meant to be an advanced guide on the bench press.
Summary & Final Notes
In summary, I hope you found this article helpful whether you’re a beginner, novice or perhaps even an intermediate with your lifting. I think it’s safe to assume advanced lifters aren’t reading bench press articles from a guy who’s never competed (nor should they in all honesty).
While the bench press is not a must do exercise unless you’re a powerlifter, it’s still a damn fun one and a pretty good one for growing your chest, anterior delts and triceps.
As I’ve mentioned before, I don’t believe it’s the greatest exercise for hypertrophy but it’s still a good one, but more importantly, one that a lot of us meatheads really care about.
There is plenty of things to consider with your bench press, but I will remind you we are all a bit different. This is a general guide, so I suggest you take this advice, apply it to your training and play around with it. None of these are hard rules.
You don’t have to do any of the things I talked about, but if you’re trying to improve your bench, I suggest you at least play around with them!
Whether that be playing with your bar path, changing your grip, adjusting your arch or even thinking of some of the cues I mentioned. See what works best for you and just get strong as hell.
Finally, two things that can’t be ignored for a great bench is that you need to practice more and you should probably aim to put on some more muscle.
If you took none of my advice, those two things alone would probably help your bench quite a bit.
Anyways, if you’re still here, I really appreciate you taking the time to read this! If you have any questions or feedback, I’d love to hear from you.
You can comment below or even just shoot me an email at dylan@five-elements.ca or just follow me on instagram @coach_dylandacosta
Happy lifting!
Cheers 🍻
Coach Dylan
References:
1. How to Bench Press: The Definitive Guide
https://www.strongerbyscience.com/how-to-bench/
2. A Biomechanical Analysis of Wide, Medium, and Narrow Grip Width Effects on Kinematics, Horizontal Kinetics, and Muscle Activity on the Sticking Region in Recreationally Trained Males During 1-RM Bench Pressinghttps://pubmed.ncbi.nlm.nih.gov/33554113/
3. MASS research review
https://www.strongerbyscience.com/mass/
4. Effect of Barbell Weight on the Structure of the Flat Bench Press
https://pubmed.ncbi.nlm.nih.gov/28415066/
5. Maximal intended velocity training induces greater gains in bench press performance than deliberately slower half-velocity training
https://pubmed.ncbi.nlm.nih.gov/24734902/
6. Bench Press Specialization Program By Jeff Nippard
https://shop.jeffnippard.com/product/bench-press-specialization-program/